GCR POS — Retail Mode
Operating guide for retail stores: selling from the product grid and the barcode scanner, with dual cash/card pricing.
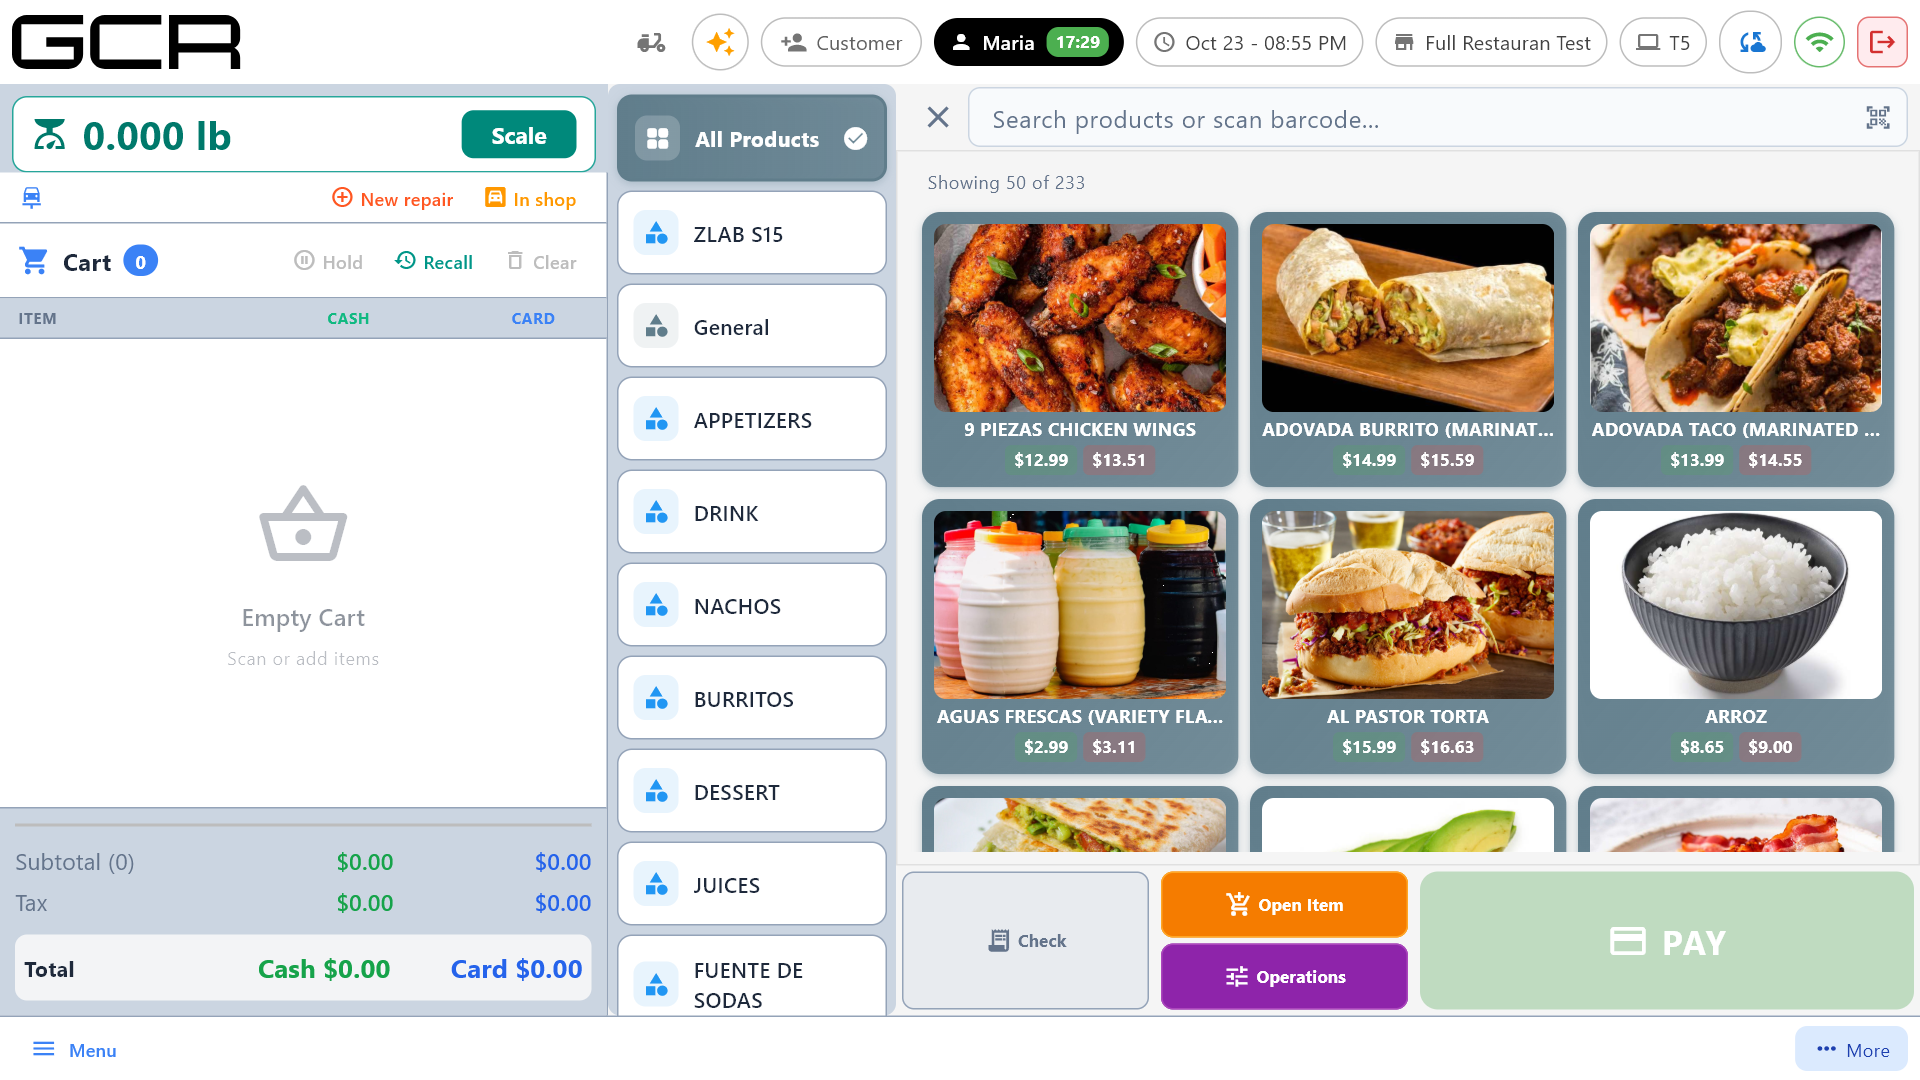
Retail is the POS's default mode. It shares almost every feature with Supermarket mode; the difference is the selling screen: Retail centers on the product grid, Supermarket on the PLU keypad. Administrative features live in the Back Office & Settings manual.
1. Logging in
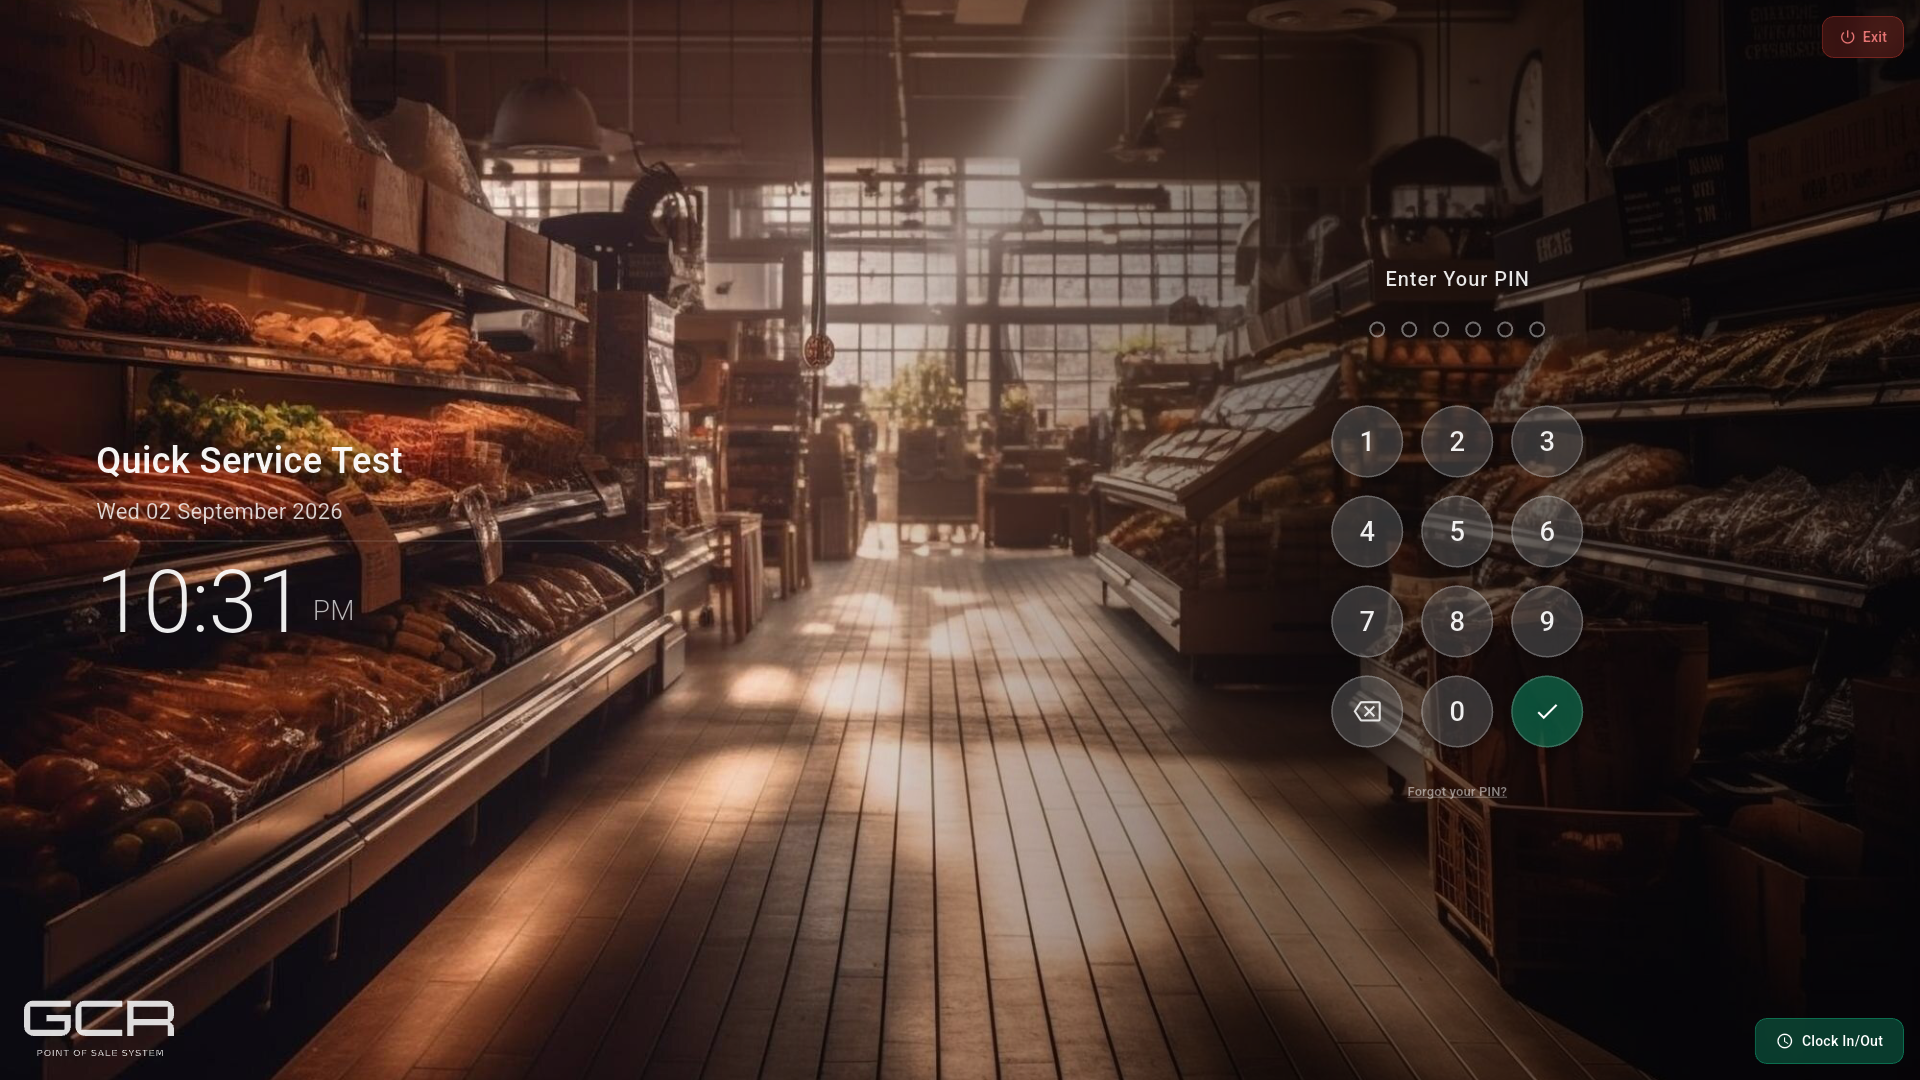
Type your PIN and confirm. Clock In/Out punches the clock without opening sales.
2. Main screen
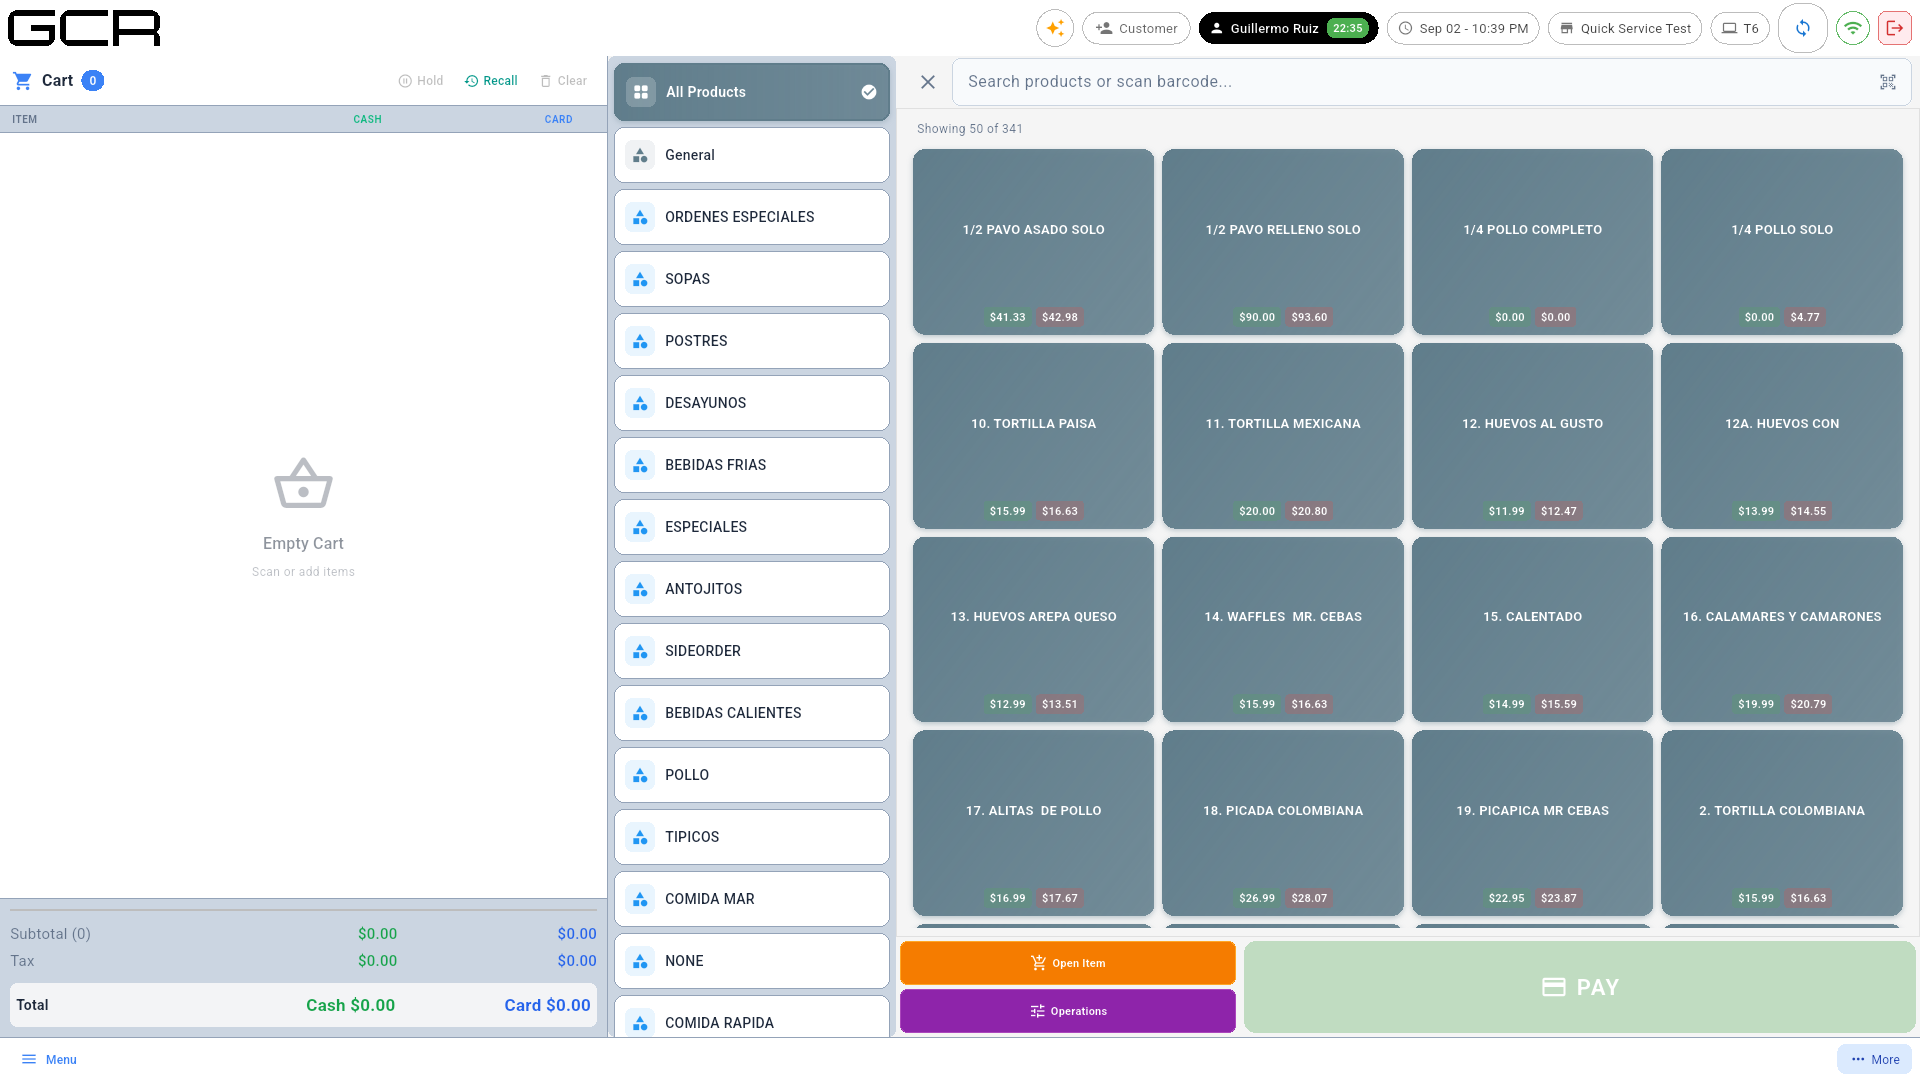
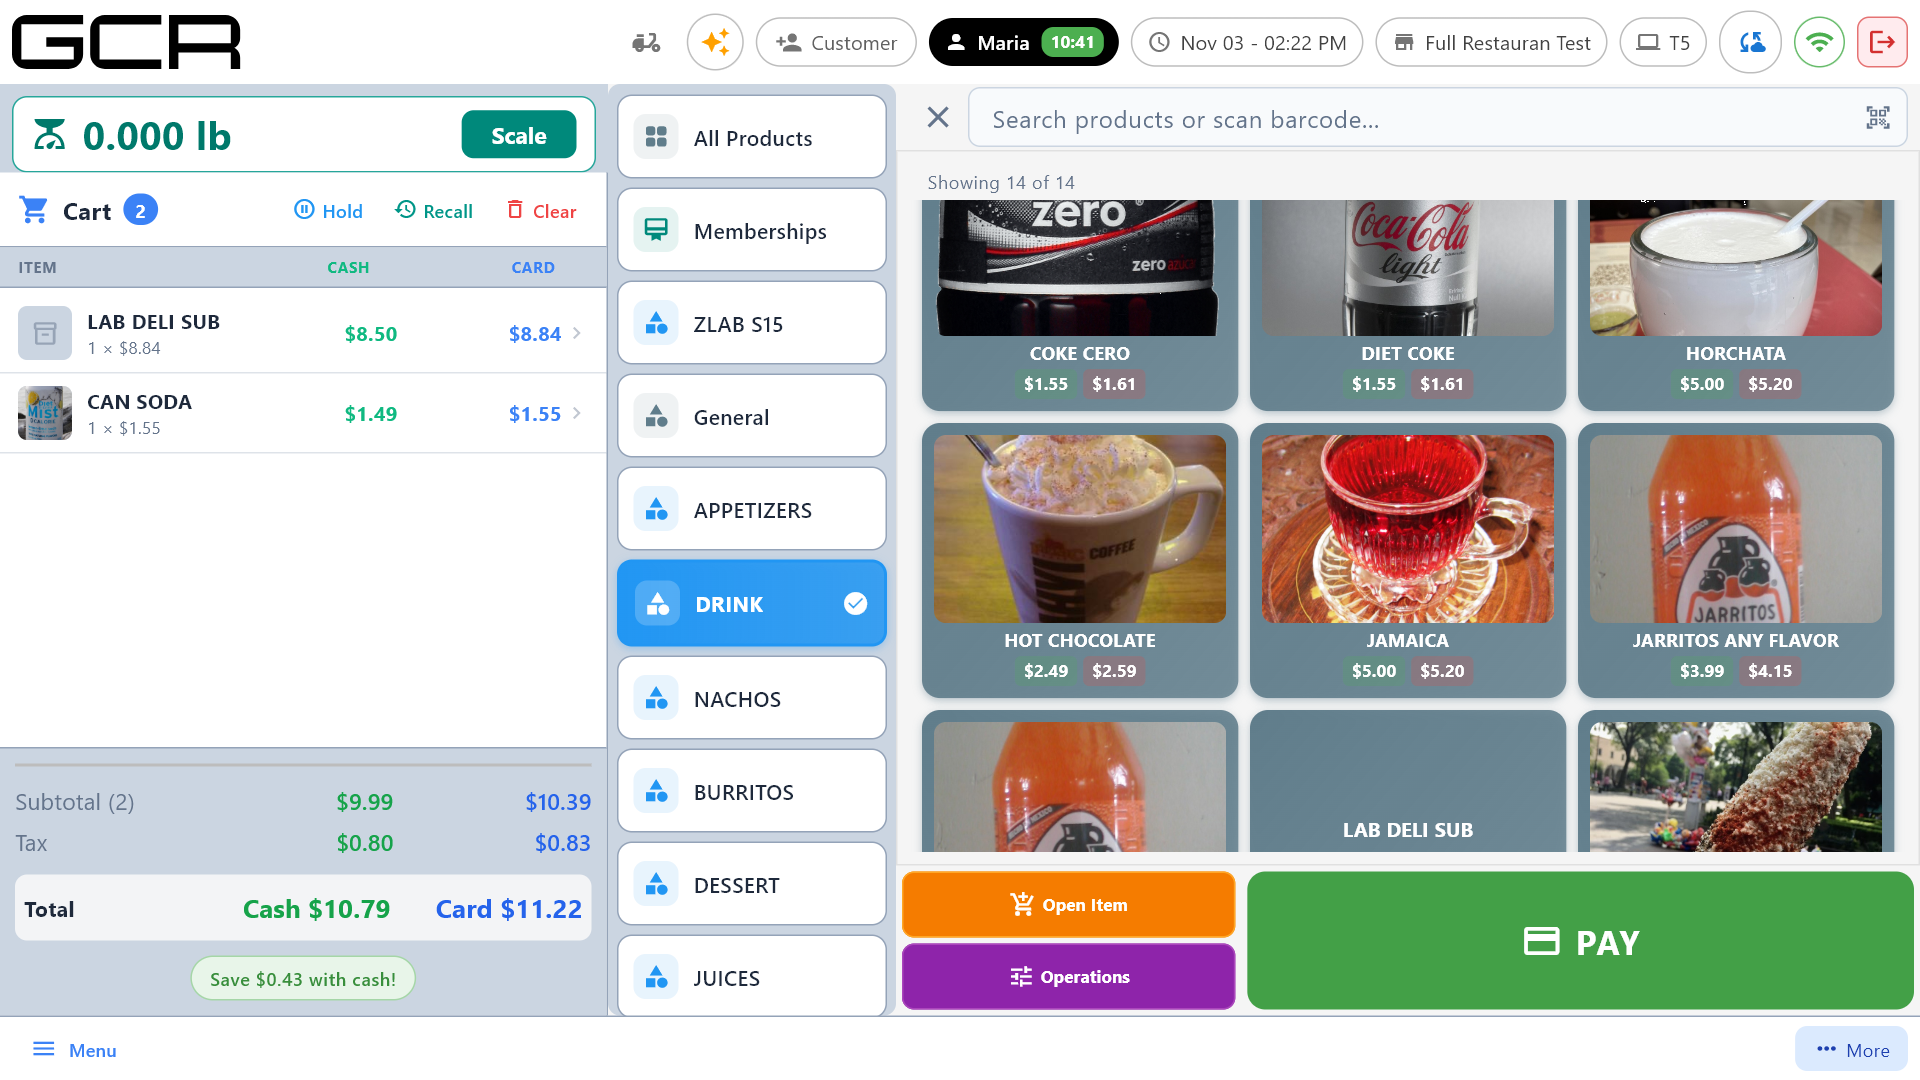
- Left: the cart with CASH/CARD prices and, in its header, the quick actions Hold / Recall / Clear.
- Center: catalog categories.
- Right: the product grid with dual prices; search bar for names or barcode scanning.
- Bottom: Open Item (no-code item), Operations (discounts/gratuity) and PAY.
3. Selling
- Scan the product or tap it on the grid (use search or categories to find it).
- If it has modifiers, the dialog opens to choose them.
- Repeat per item; tap a cart line to change quantity or remove it.
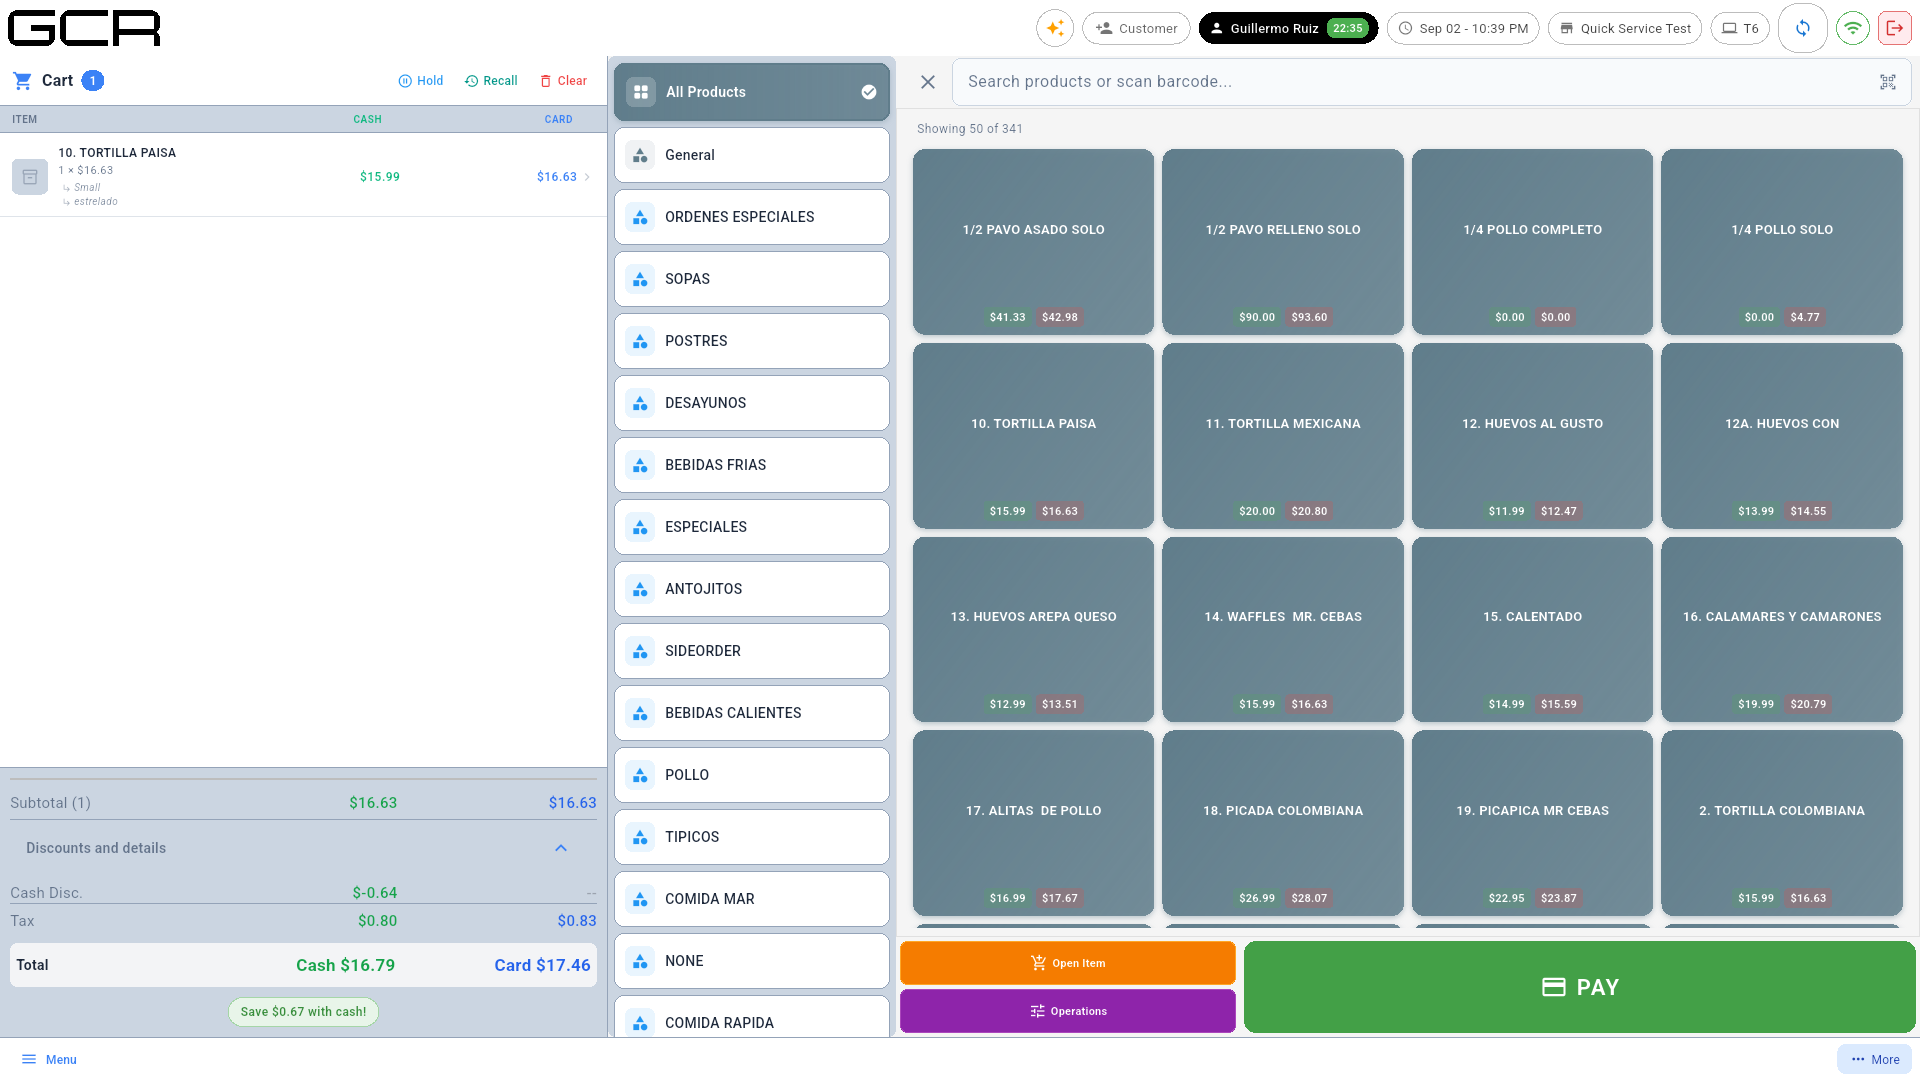
Scanner: a USB reader works as a keyboard — scanning drops the product straight into the cart with quantity 1; tap the cart line to change the quantity. The top search field accepts name, code or UPC.
Need PLU selling with a multiplier (3 @ 4011), price + category and
a large keypad? Those quick keys belong to Supermarket mode: a
technician can switch the terminal's mode from the portal (see the
Supermarket manual §3).
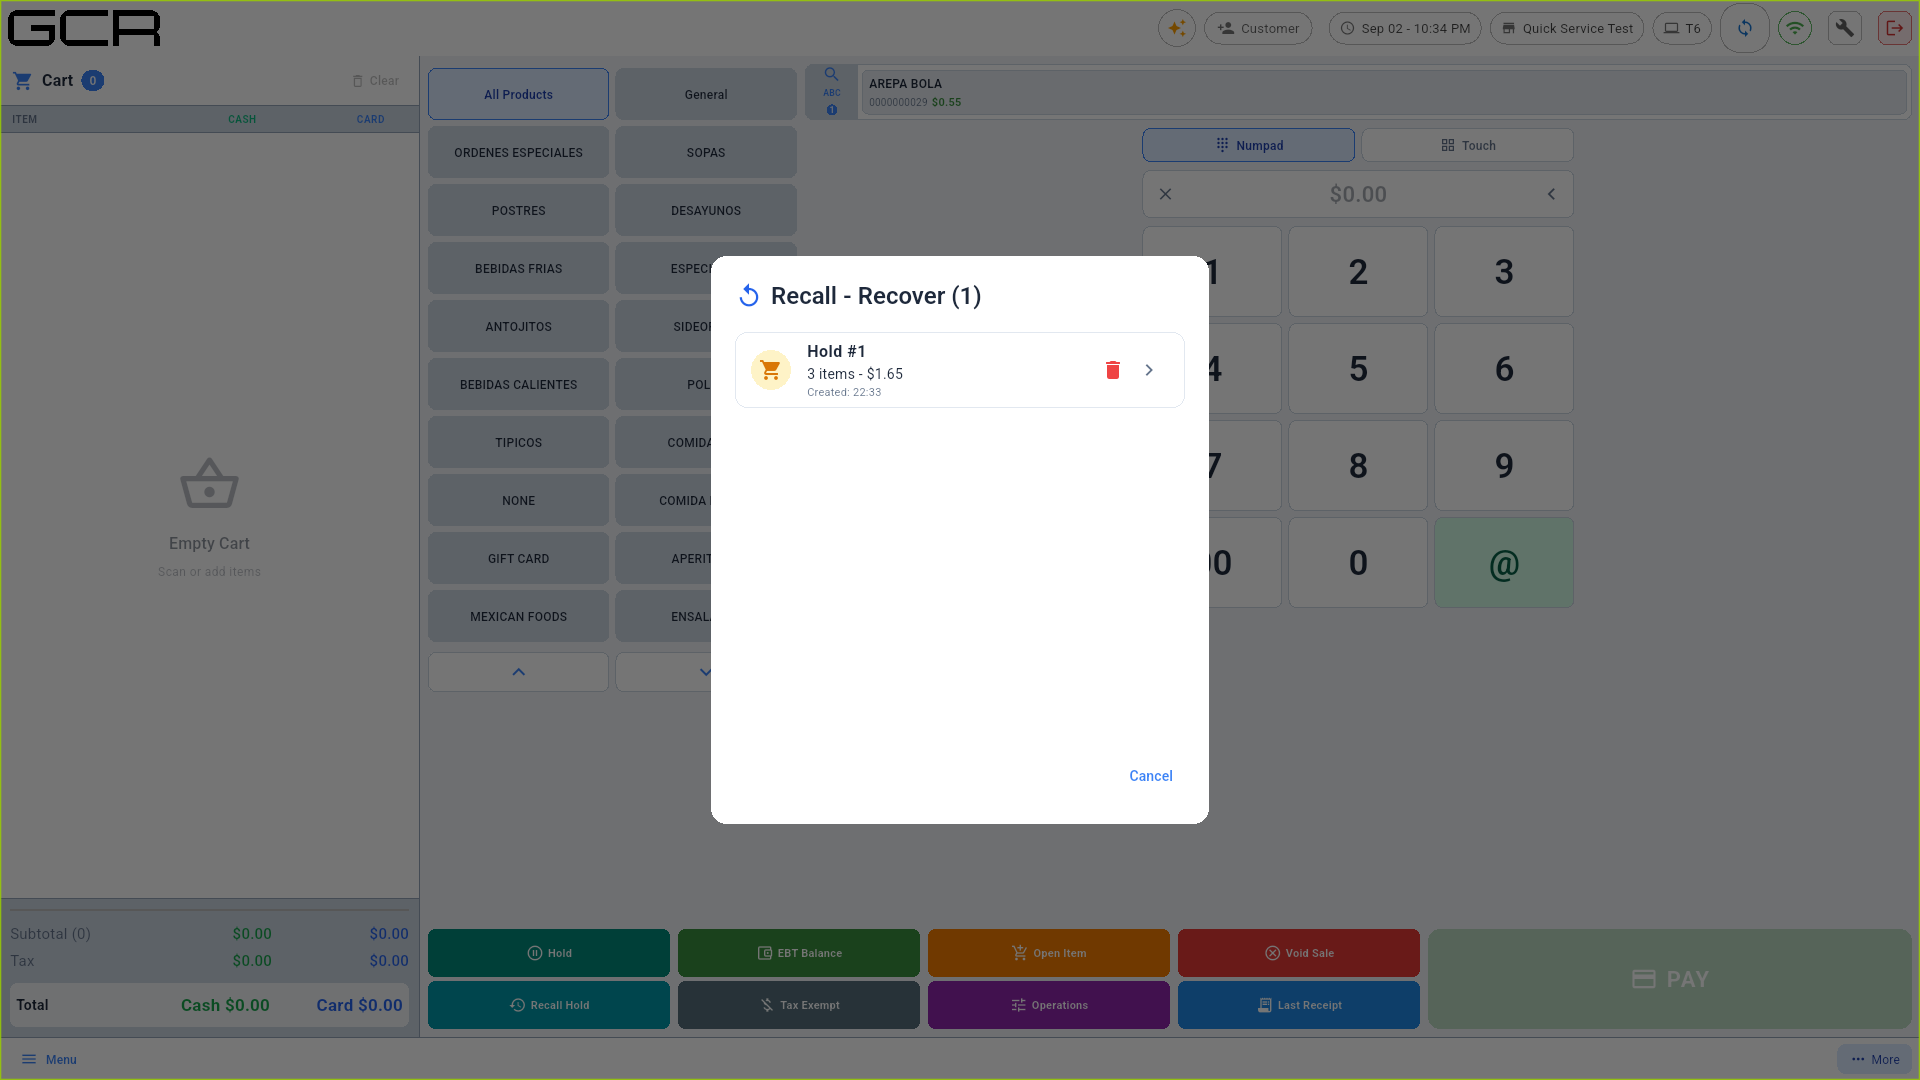
- Hold / Recall (cart header) park and recover sales:
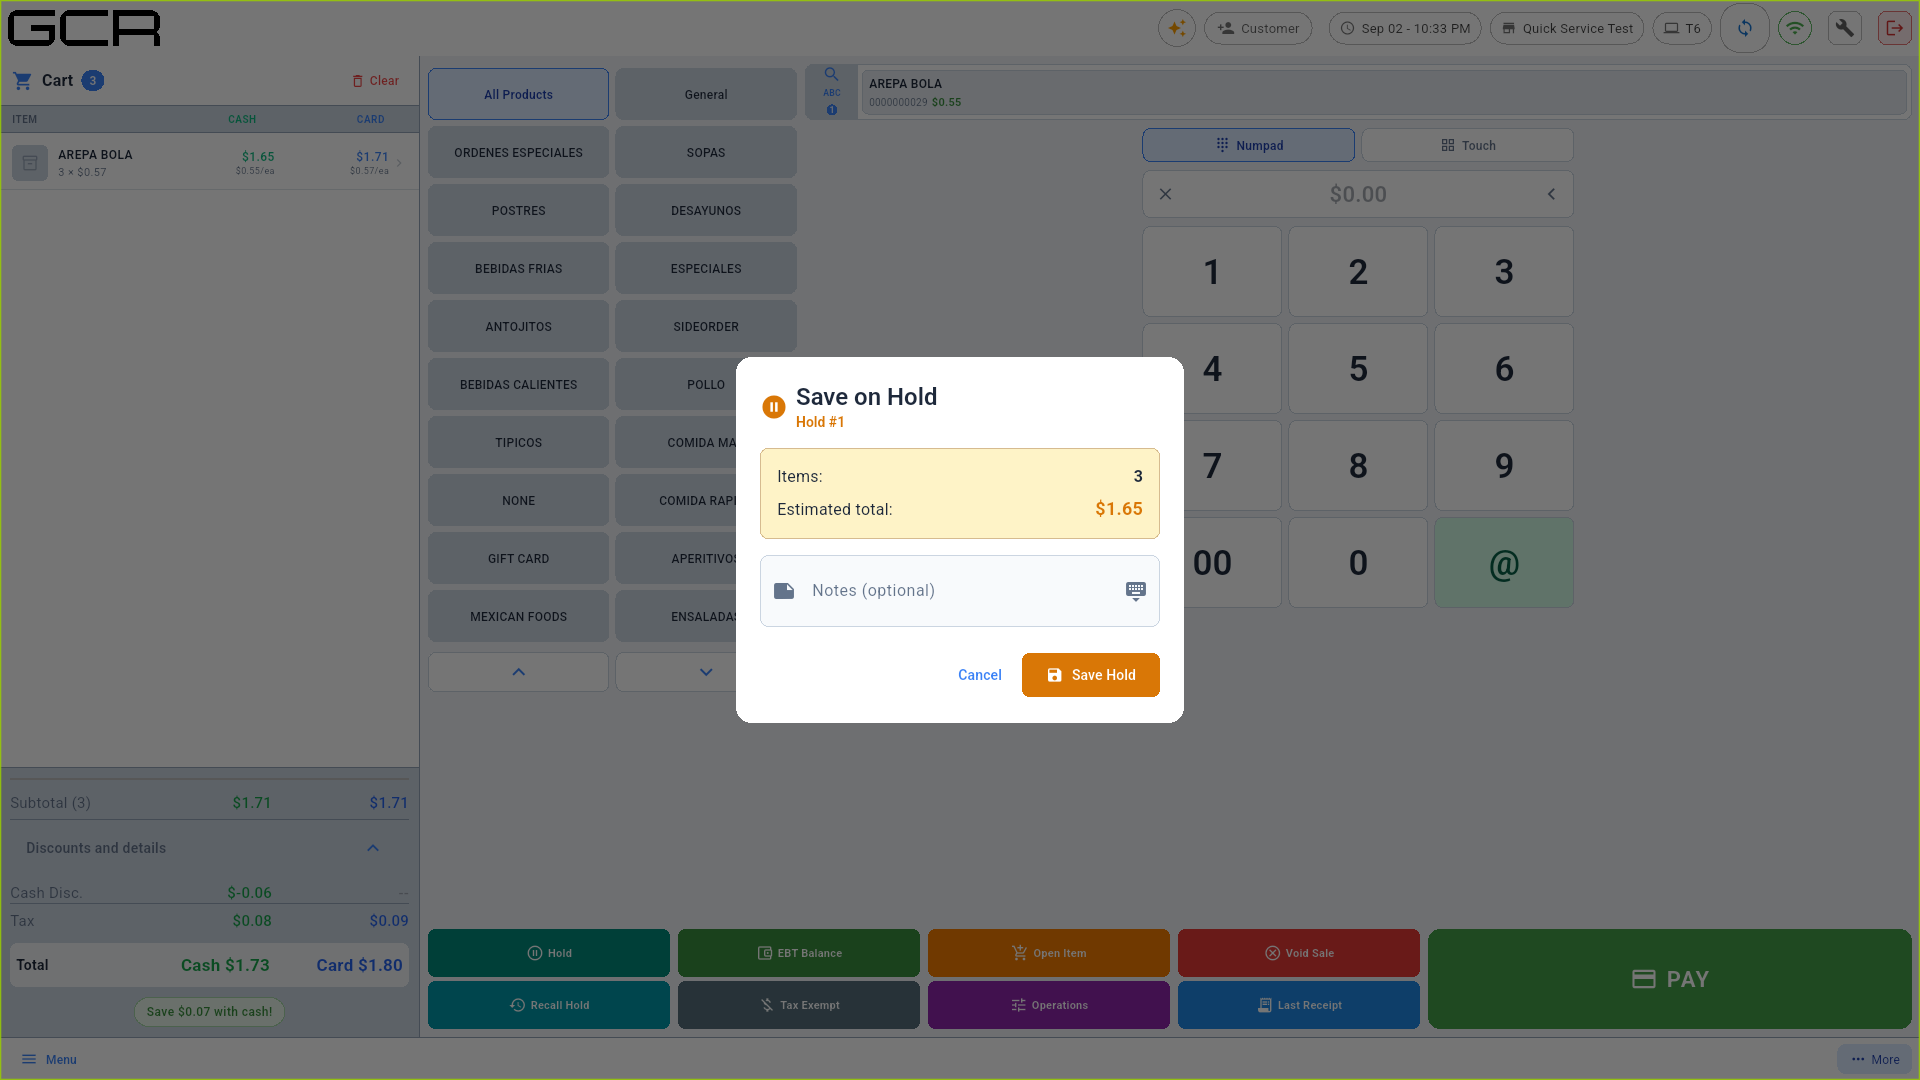
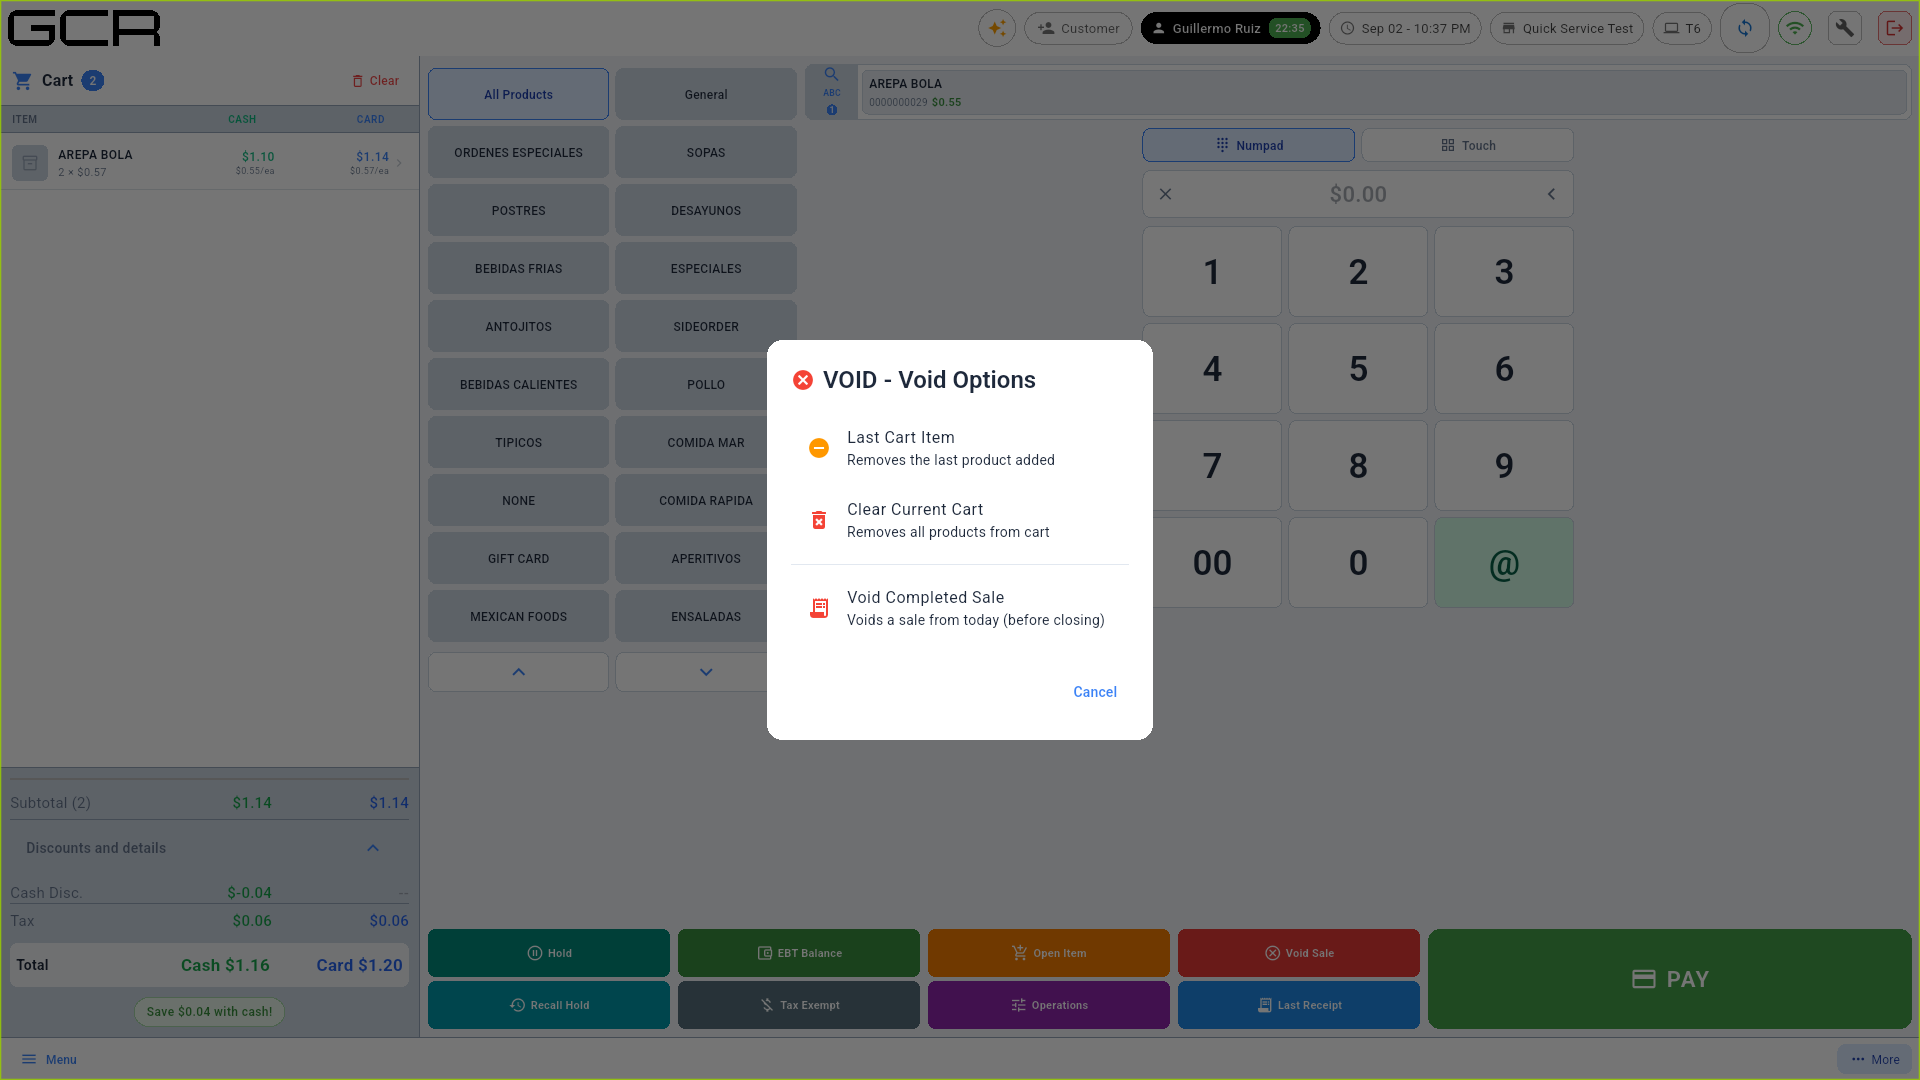
- Clear empties the cart. Void Sale (via Operations) voids completed same-day sales:
4. Charging
Payment requires an open cash shift (side menu → Open Shift, with a starting fund). Then PAY:
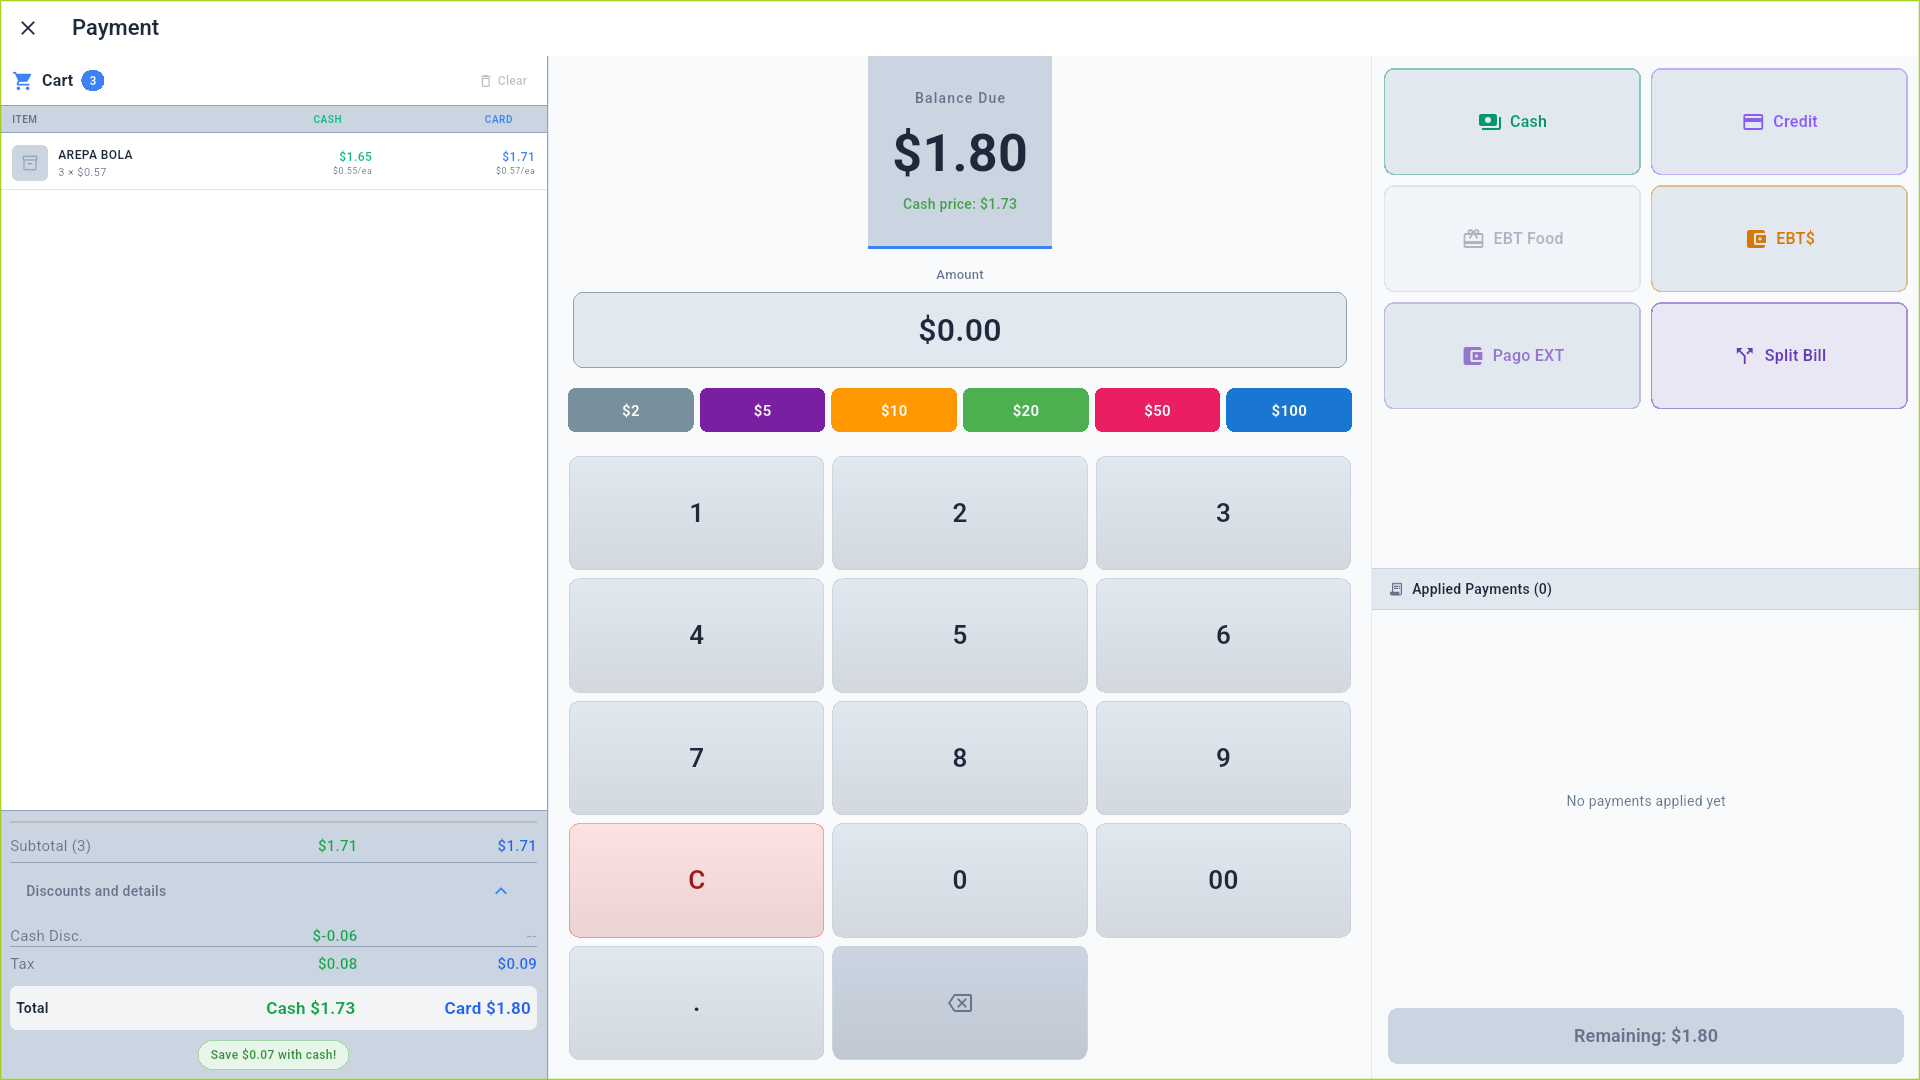
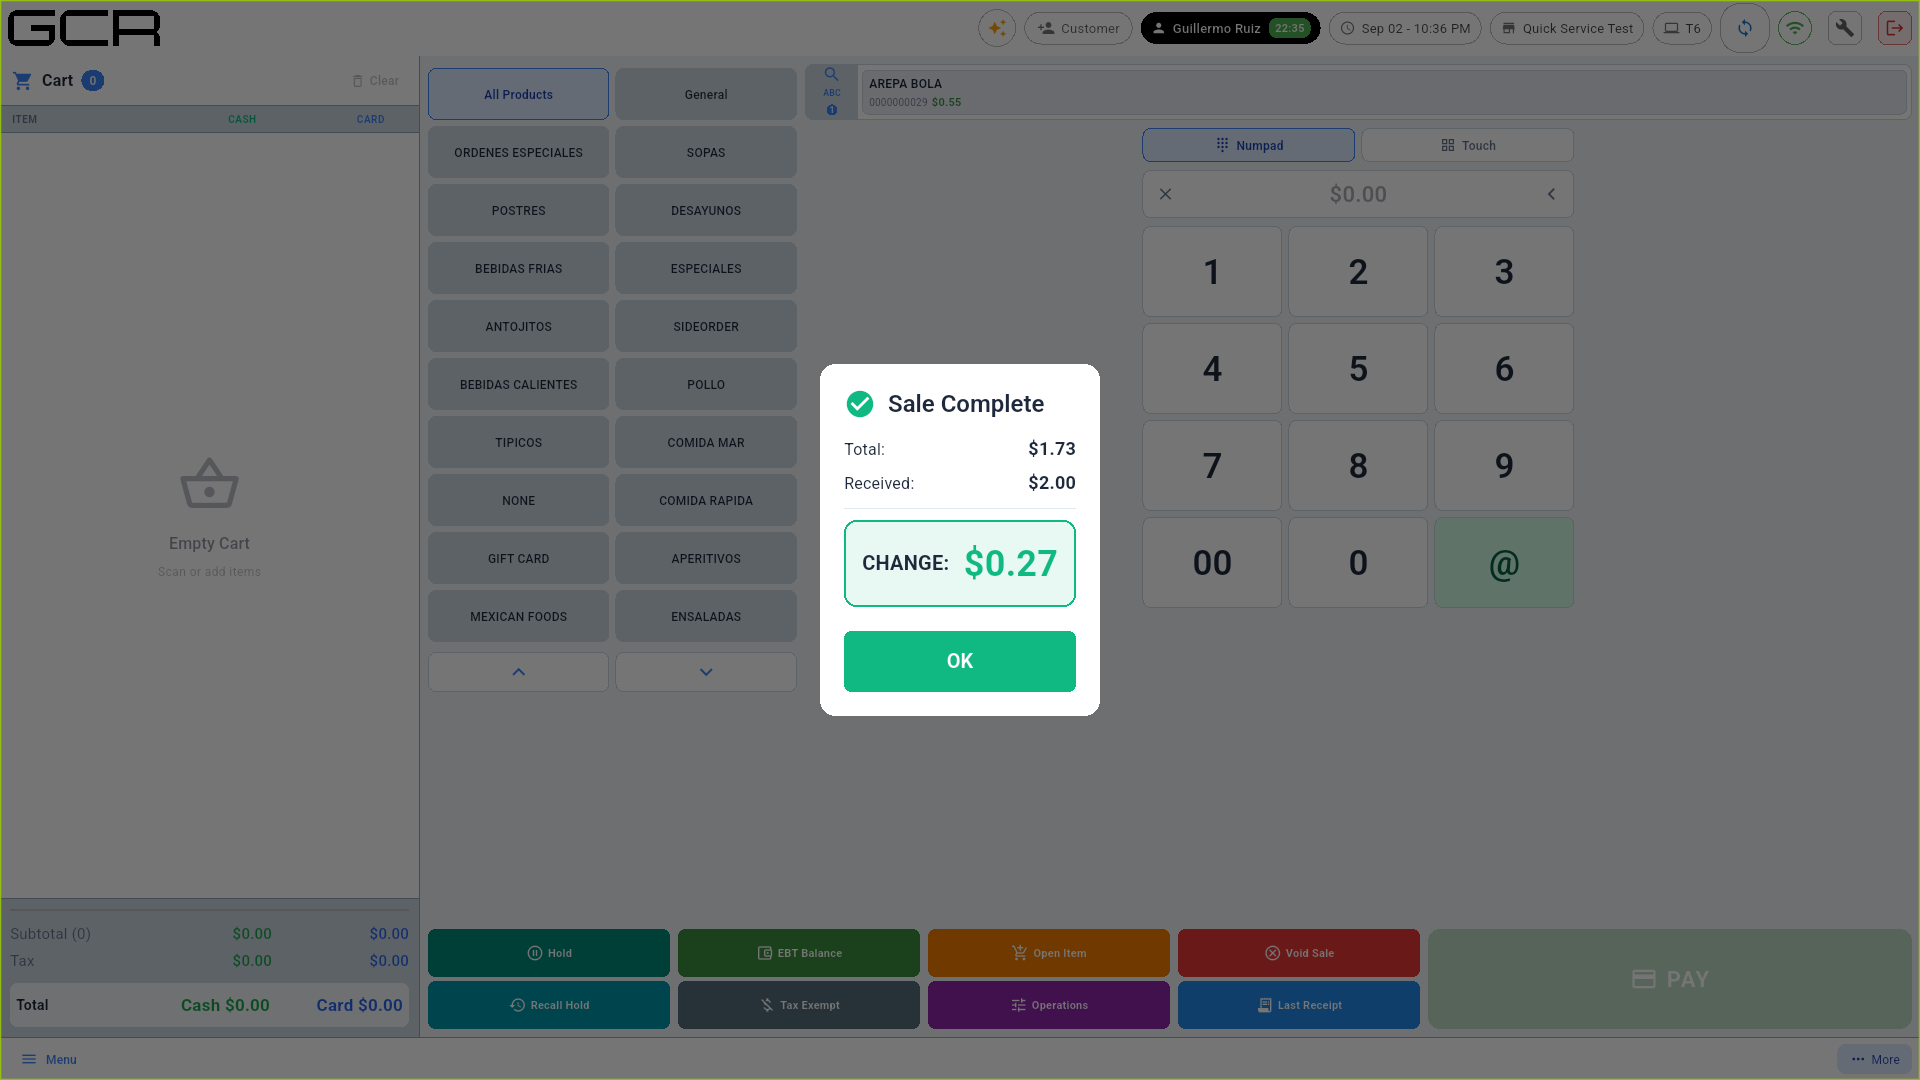
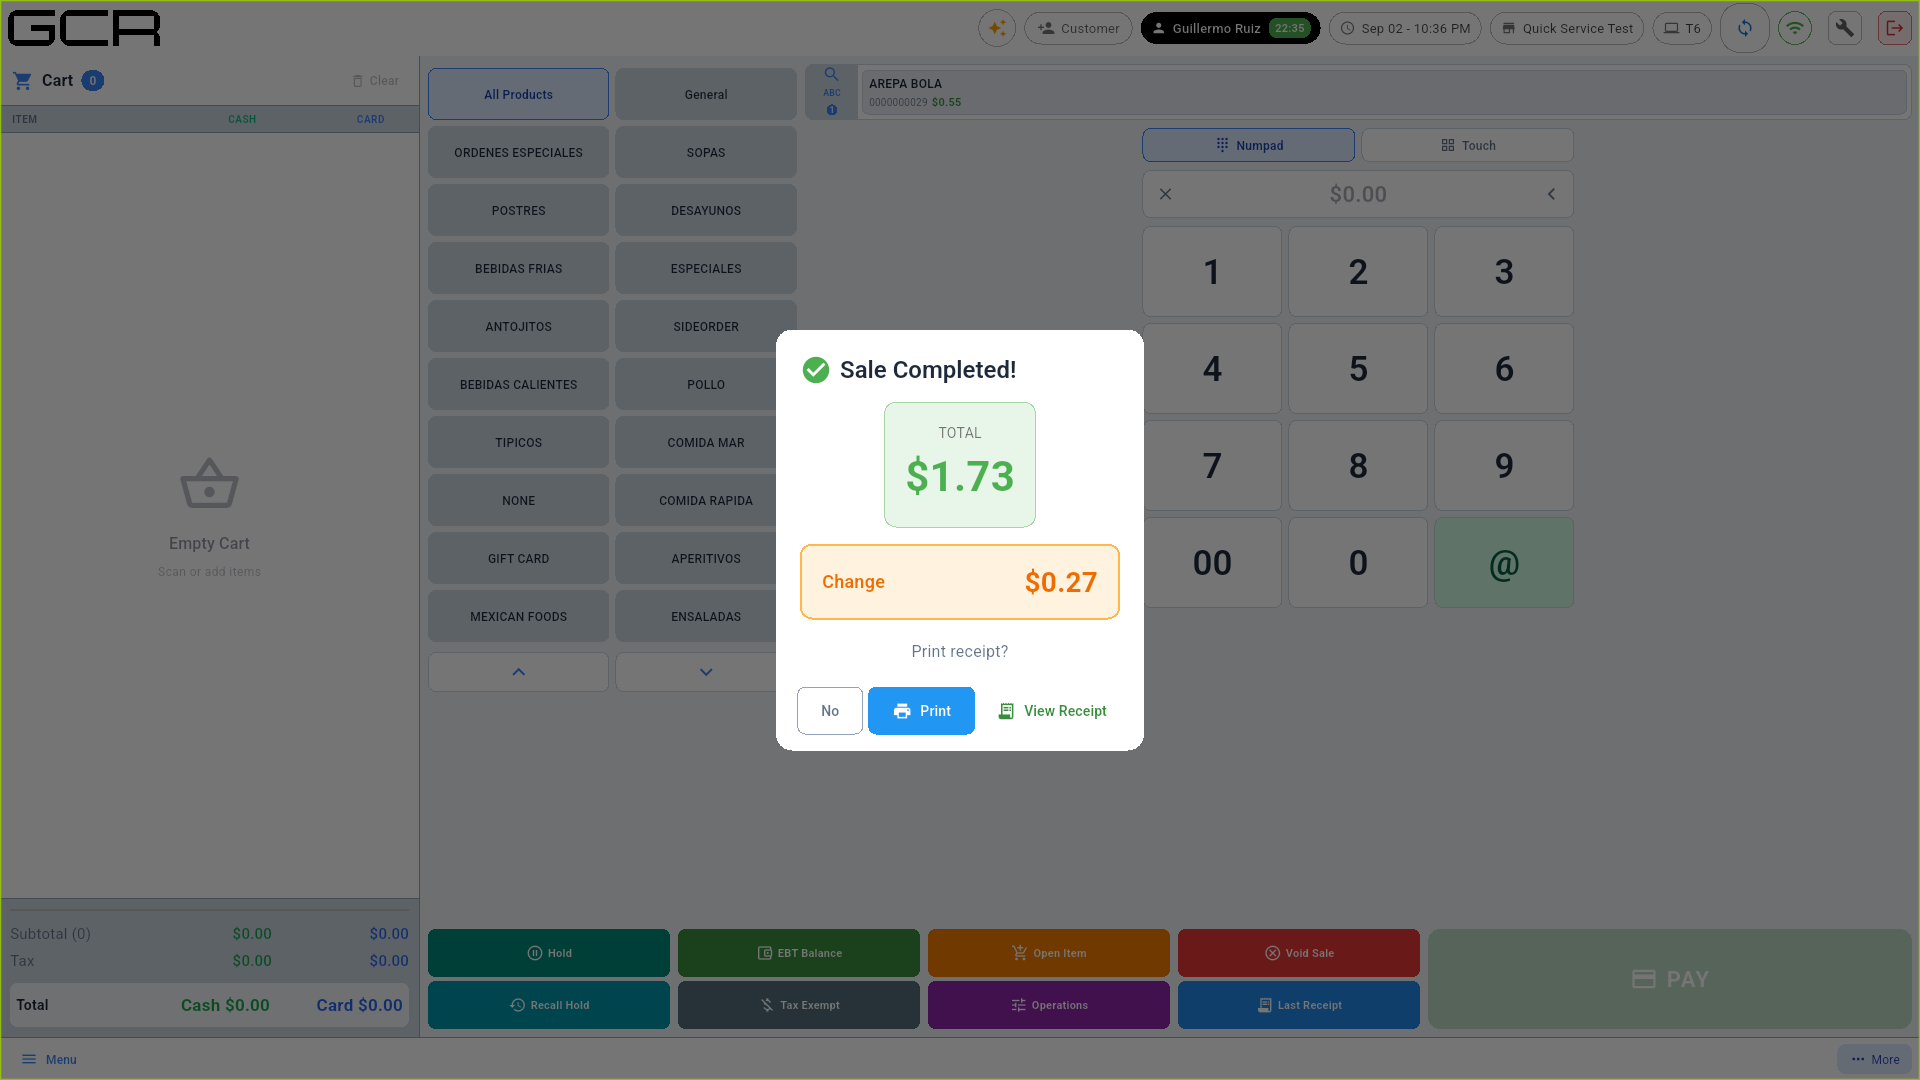
Tenders: Cash / Credit / EBT Food / EBT$ / Pago EXT / Split Bill, with quick bill buttons. Cash computes the change and offers to print the receipt:
5. Everything else
Identical to Supermarket mode and documented there and in Back Office:
- Quantity multiplier, Open Item, EBT, Tax Exempt, Last Receipt → Supermarket manual §3-8.
- Cart discounts and gratuity (Operations button) → Supermarket §9.
- X Report, Z Report (register closing), register Operations, Back Office (reports, products, inventory, customers, users, attendance) and Settings → Back Office & Settings manual.
6. Memberships (car washes and recurring plans)
A membership is a plan the customer pays every cycle (week, month,
quarter or year) that includes certain services — a car wash selling
Unlimited washes for $20 a month or 2 premium washes a month, for
instance. Every member has a code (M0000001, M0000002…) printed on
their card as a barcode and a QR; one scan tells the POS who they are, which
plan they have and what is left this cycle. The fee is collected at the
register or, when the member left a card, charged to the card on file
kept in the iPOSpays (Dejavoo) vault. GCR POS never stores card
numbers: only a token that works solely on your store's payment terminal.
Memberships are switched on per store from the portal (Settings → Register Operations → Memberships module). If the store has them off, nothing in this section shows up on the POS. Plans (price, frequency, included services) are created in the portal, not at the register.
6.1 Identifying a member
Two ways, and both open the member panel:
- Scan their card (the barcode or the QR; any scanner works, the scale's included) with the sale screen in front.
- Or tap Customer and pick them from the list.
- If the card will not scan, type the code (
M0000001) in Search products or scan barcode... and press Enter.
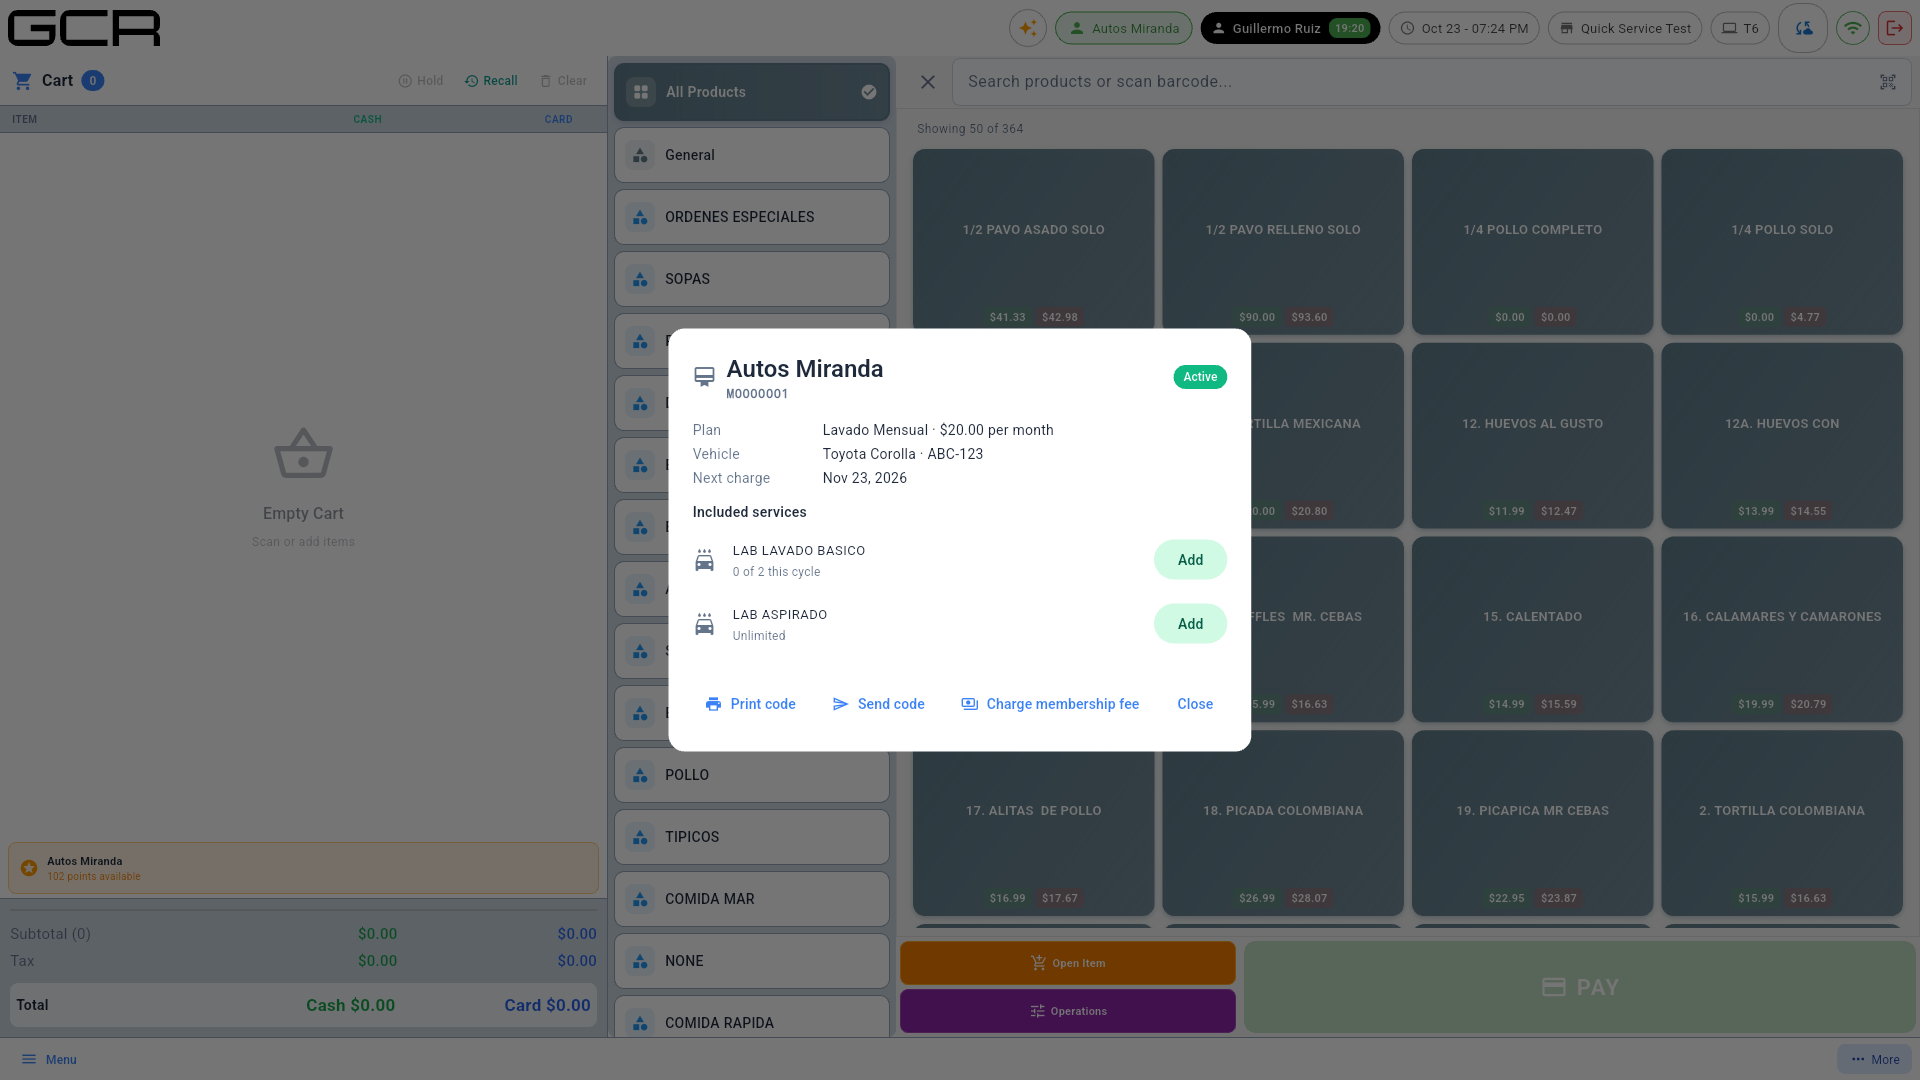
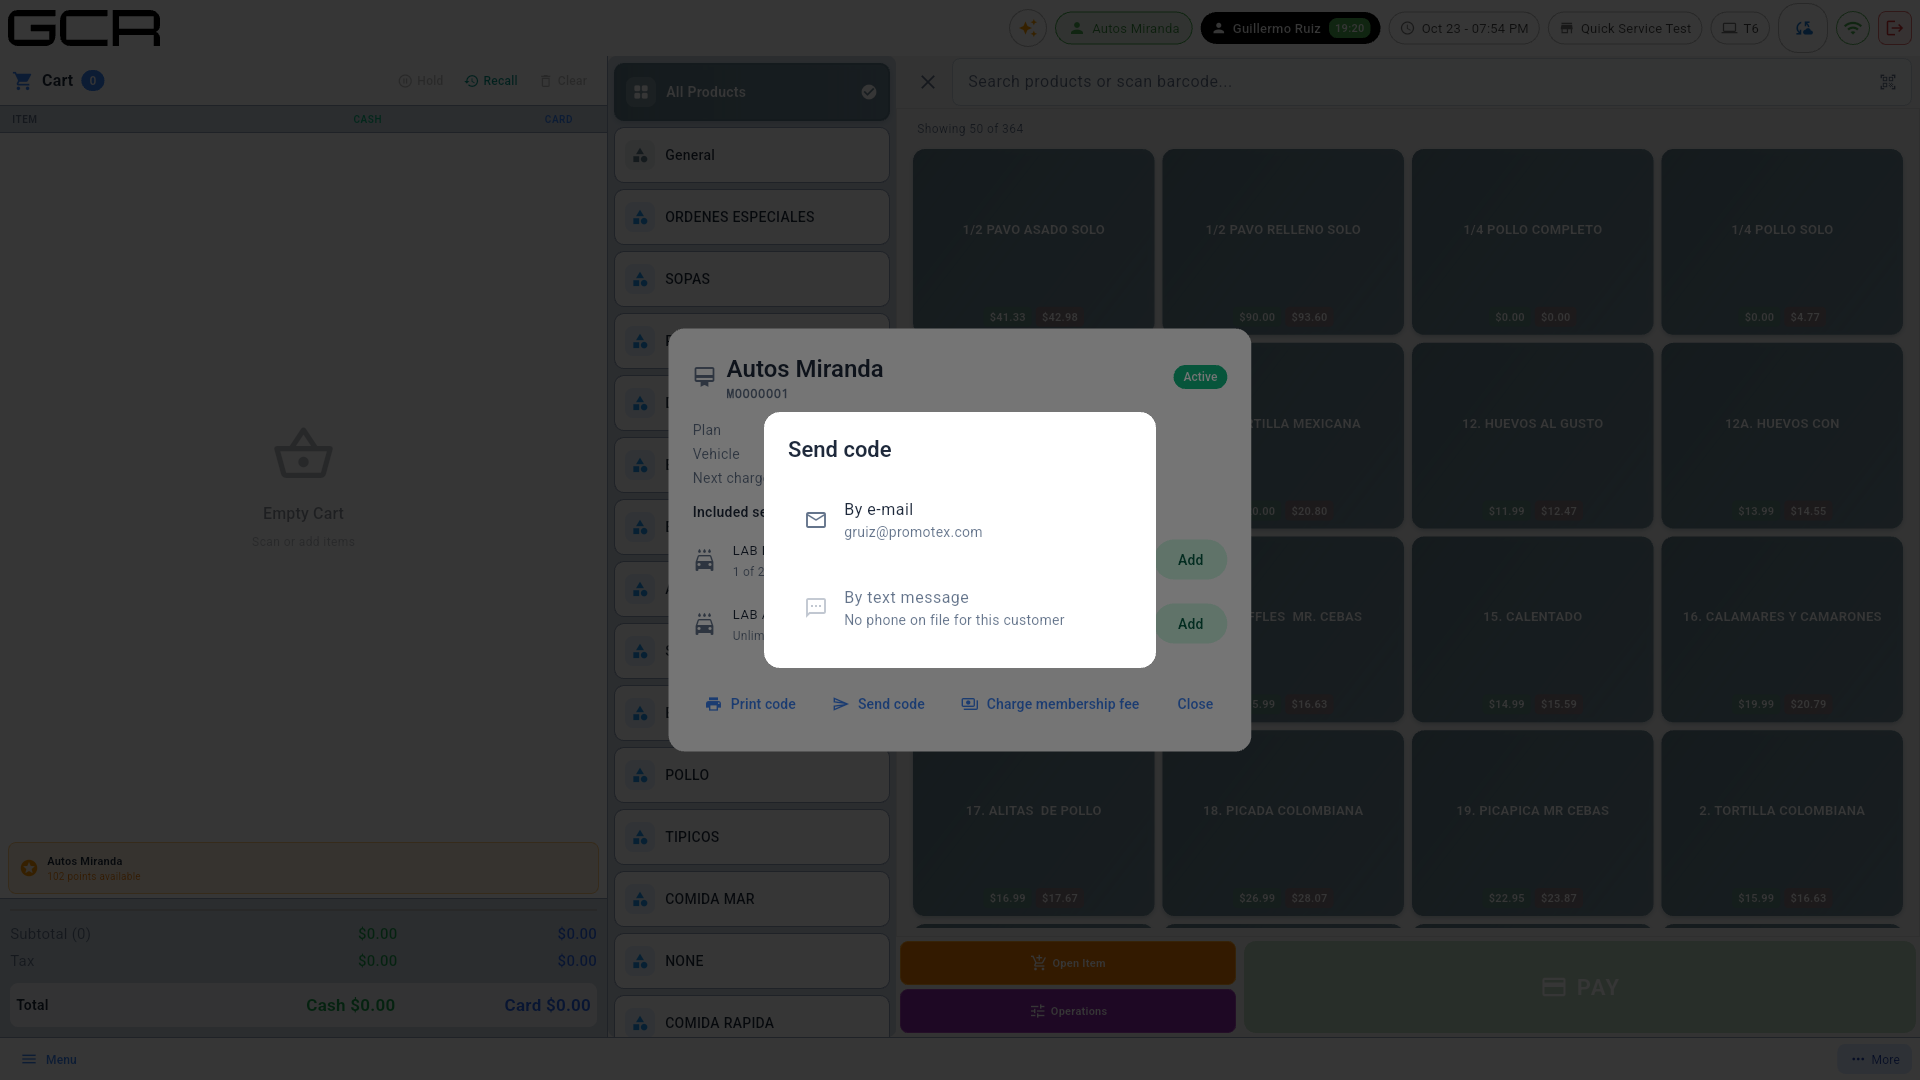
The panel shows name, code and status — Active, Past due, Pending
payment, Expired or Cancelled —, the Plan with price and
frequency, the Next charge, the Card on file (brand and last 4) and
the Included services with this cycle's usage: 1 of 2 this cycle or
Unlimited. Services are added, the fee charged and the code printed or
sent from there.
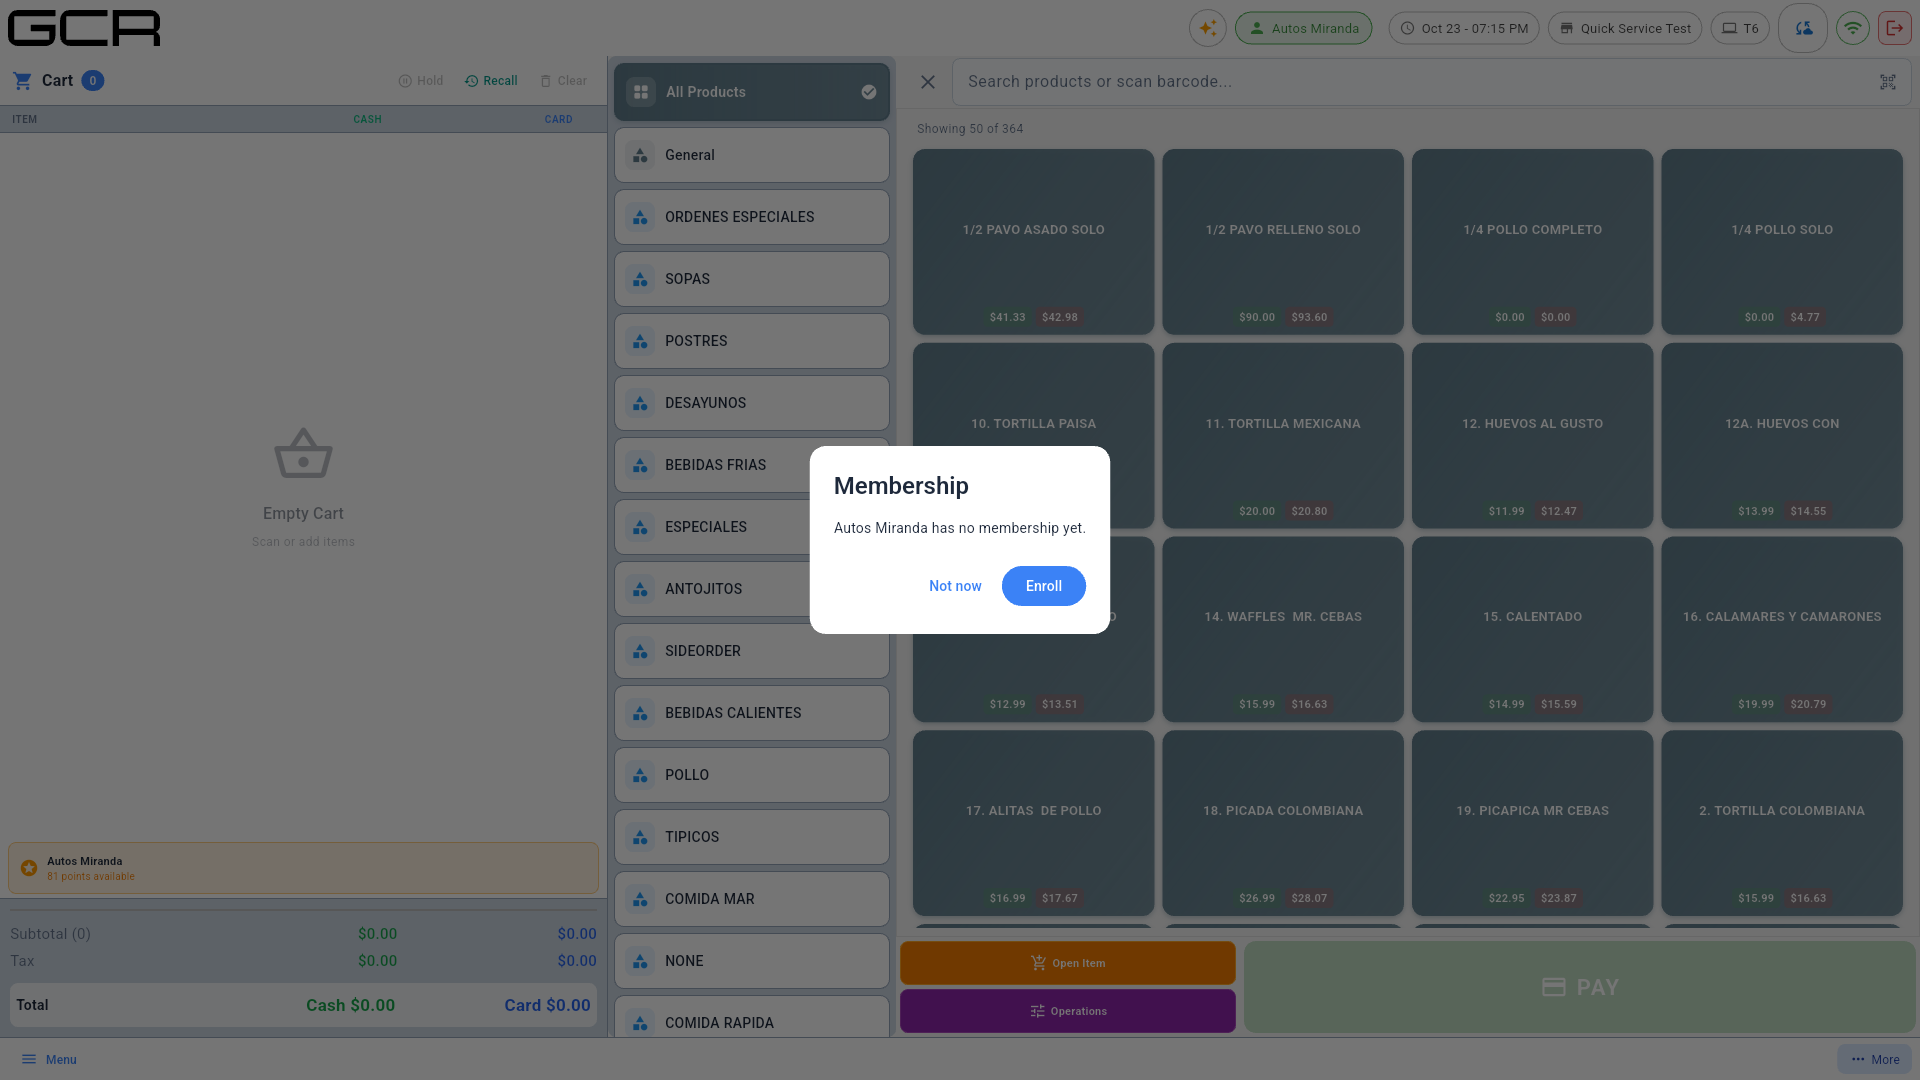
Scanning a code that does not exist shows "No membership with code M…" and nothing else happens. Picking a customer who is not a member yet asks "[Name] has no membership yet." with Enroll and Not now.
6.2 Giving an included service
- In the panel, tap Add next to the service.
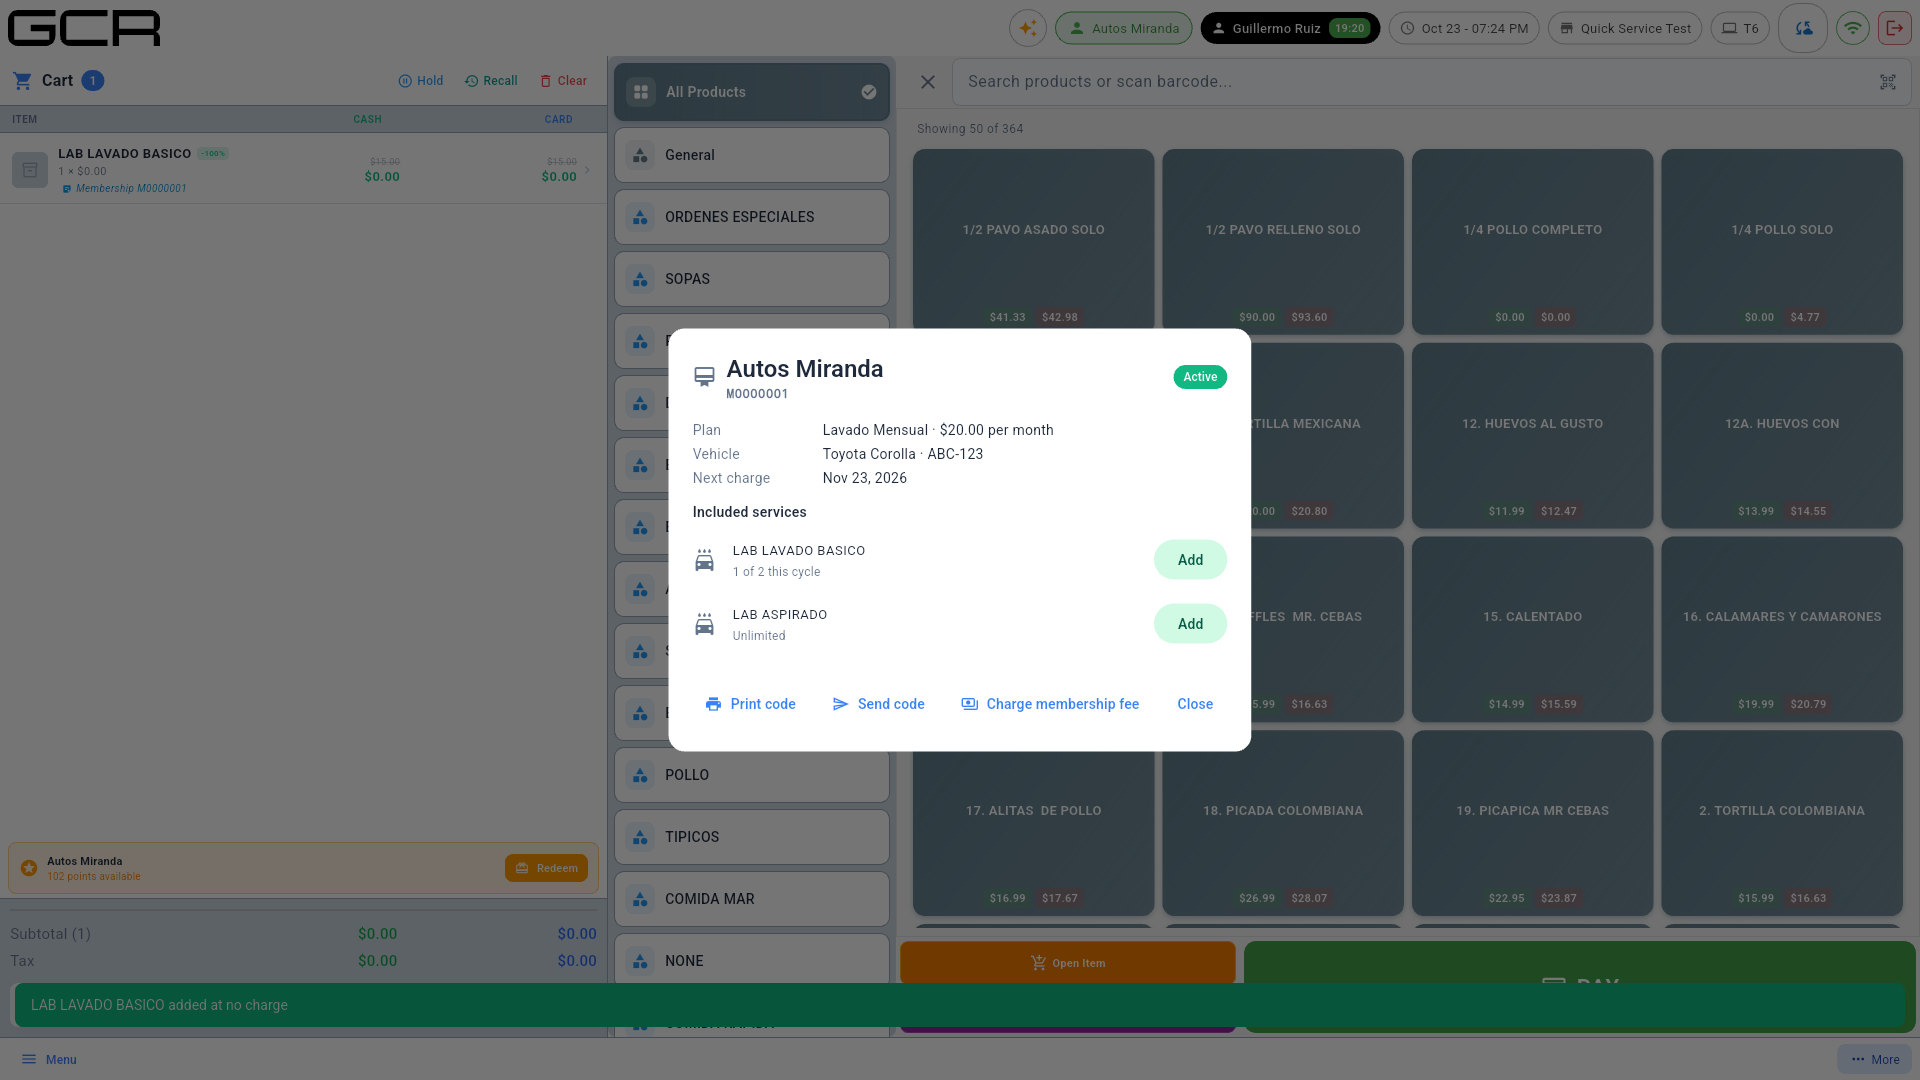
- The line enters the cart at $0.00 (−100%) with the note Membership M… and the toast "… added at no charge". If the member already used up the cycle, the button reads Quota reached and will not add more.
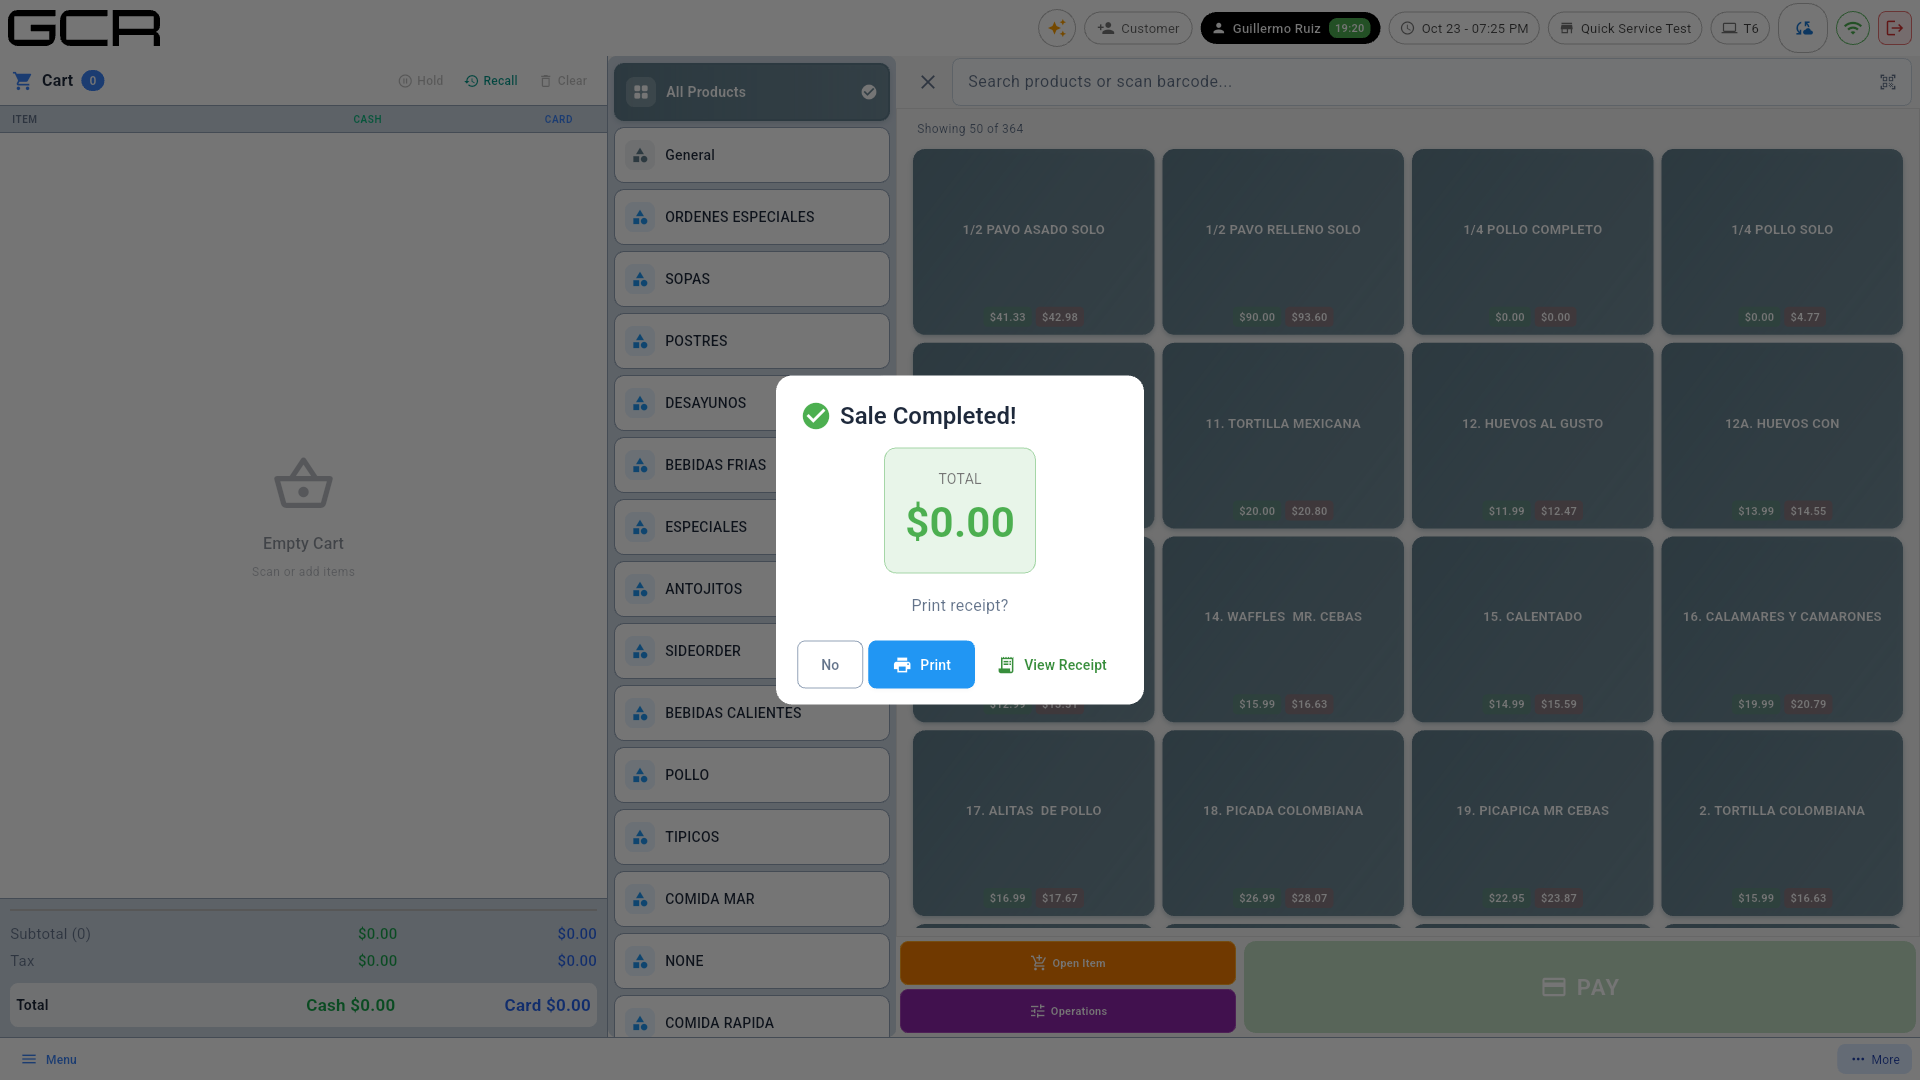
- Add whatever else the customer takes (that is charged as usual) and tap PAY. If the cart ends at $0.00 the sale closes by itself: no payment screen, and the receipt prints at $0.00.
The visit is recorded in the cloud at once; next time the panel shows
2 of 2 this cycle. Unlimited services never run out.
6.3 Charging the fee (first payment or renewal)
- In the panel tap Charge membership fee: the plan's fee product (for example LAB SERVICIO T3 $20.00) enters the cart with its tax, and the toast "Membership fee added to the cart" confirms it.
- PAY and collect like any sale: cash or card.
- Card on the pinpad (chip, tap or swipe): besides paying, the card is kept on file for the following charges. The panel then shows Card on file: Mastercard •••• 1234.
- Cash: the membership activates all the same, but no card is kept; the next cycle has to be collected at the register again.
- The membership becomes Active and Next charge moves one cycle.
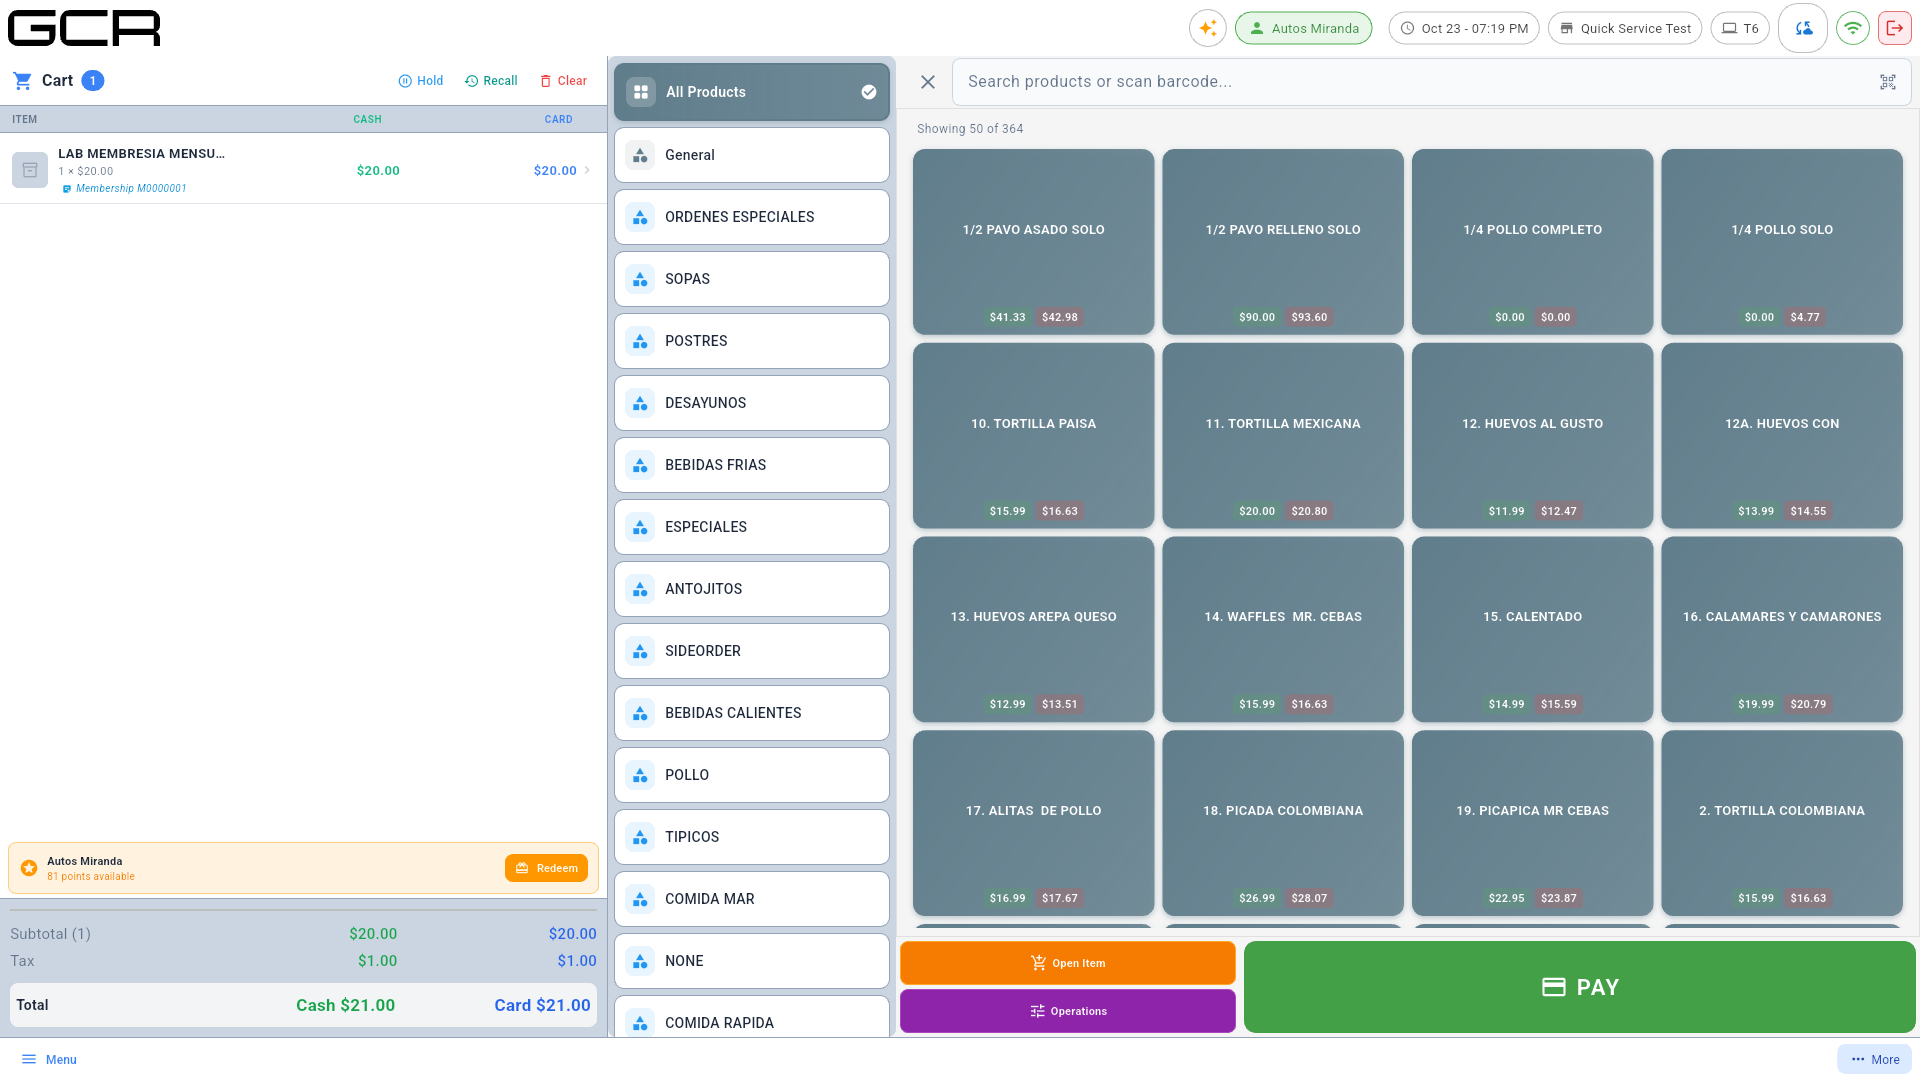
Renewing is the same button. If the member is still active, the new cycle starts where the current one ends (nothing resets, nothing paid is lost): a member paid through December 23 who pays again today is paid through January 23.
Collecting cash may ask for a supervisor authorization when the cashier lacks the Collect Cash Payment permission (see permissions in the portal, Employees).
6.4 Enrolling a new member
Fastest way: from the plan buttons. With memberships switched on, the category list on the sale screen has a Memberships entry right below All Products. It shows one button per plan of the store, with its price and frequency (Lab Wash Monthly — $20.00 per month). Plans are the ones created in the portal; there is nothing to set up at the register.
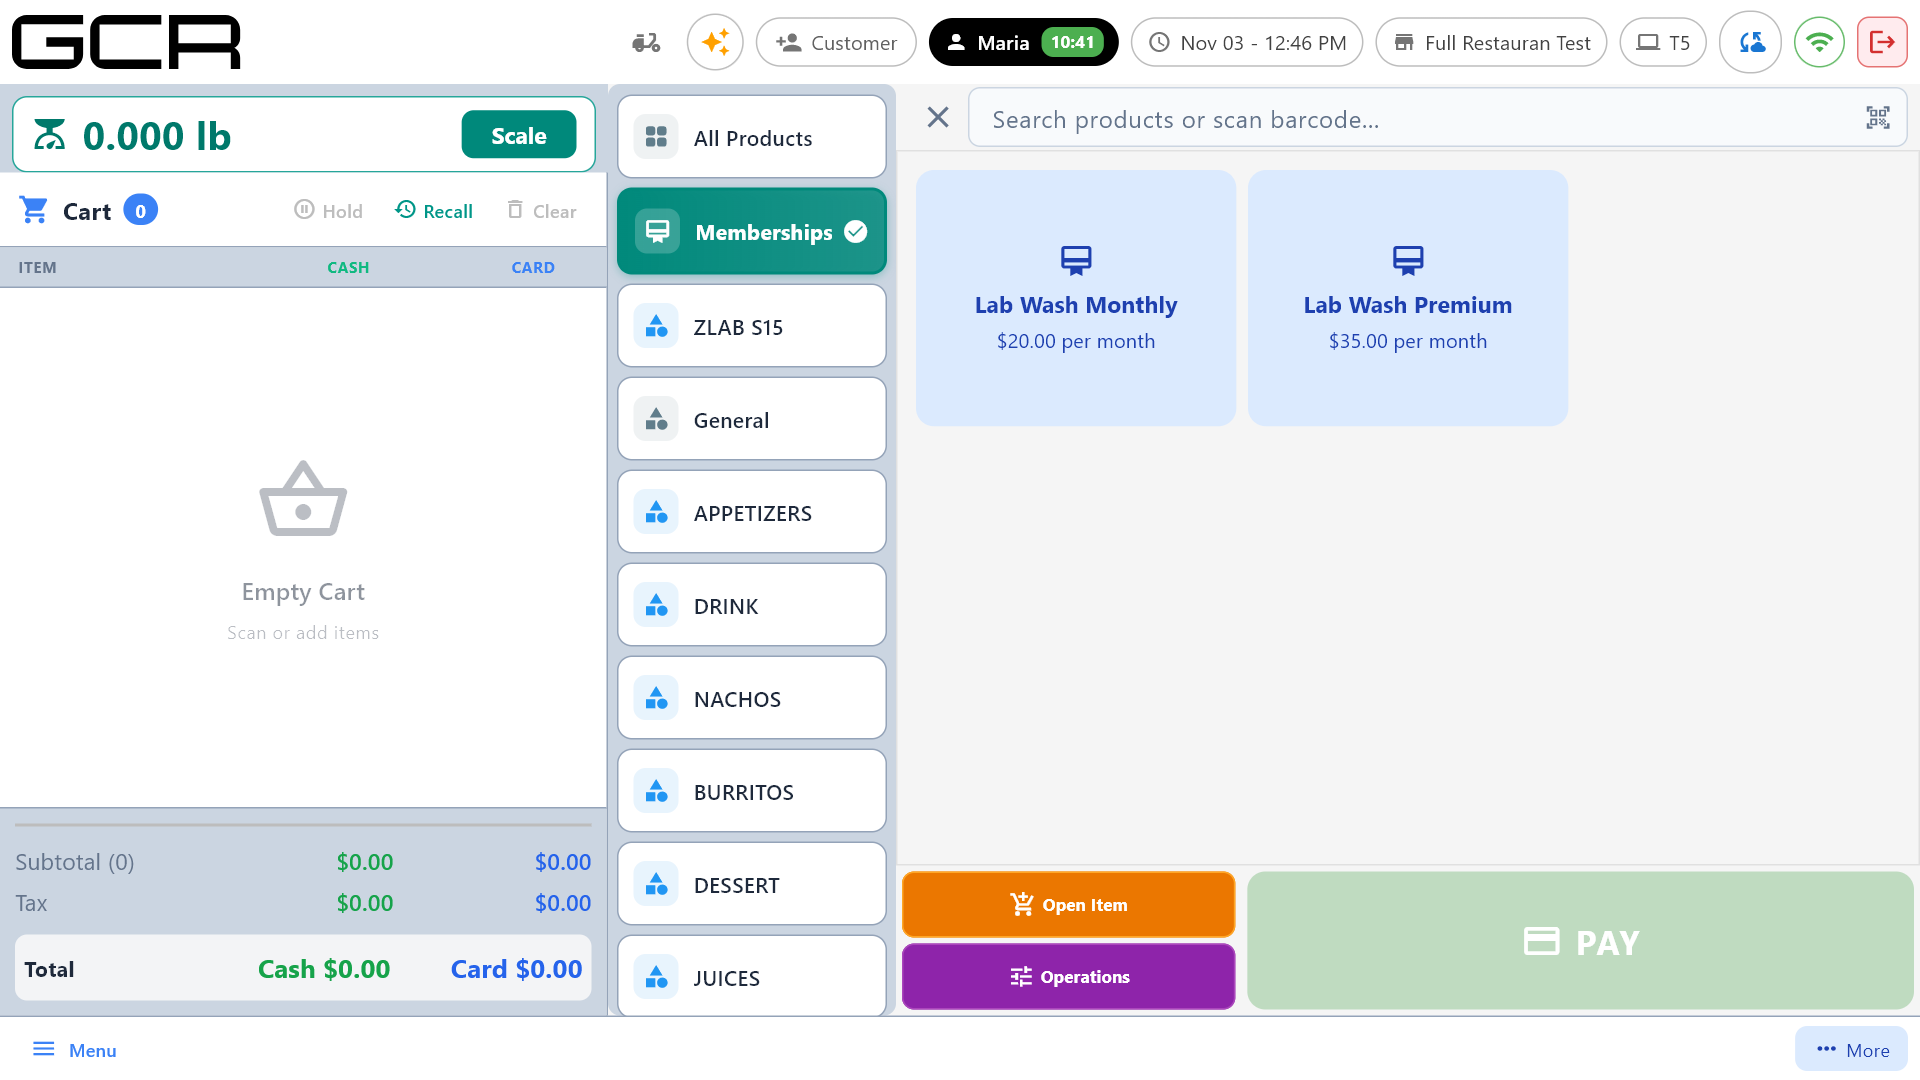
- Tap Memberships and then the plan the customer wants.
- New customer (nobody on the sale): the New Customer form opens with Next instead of Save. Fill in name and phone (and e-mail if they want the code by e-mail) and tap Next. Existing customer: attach them first with Customer, then tap the plan; the form is skipped.
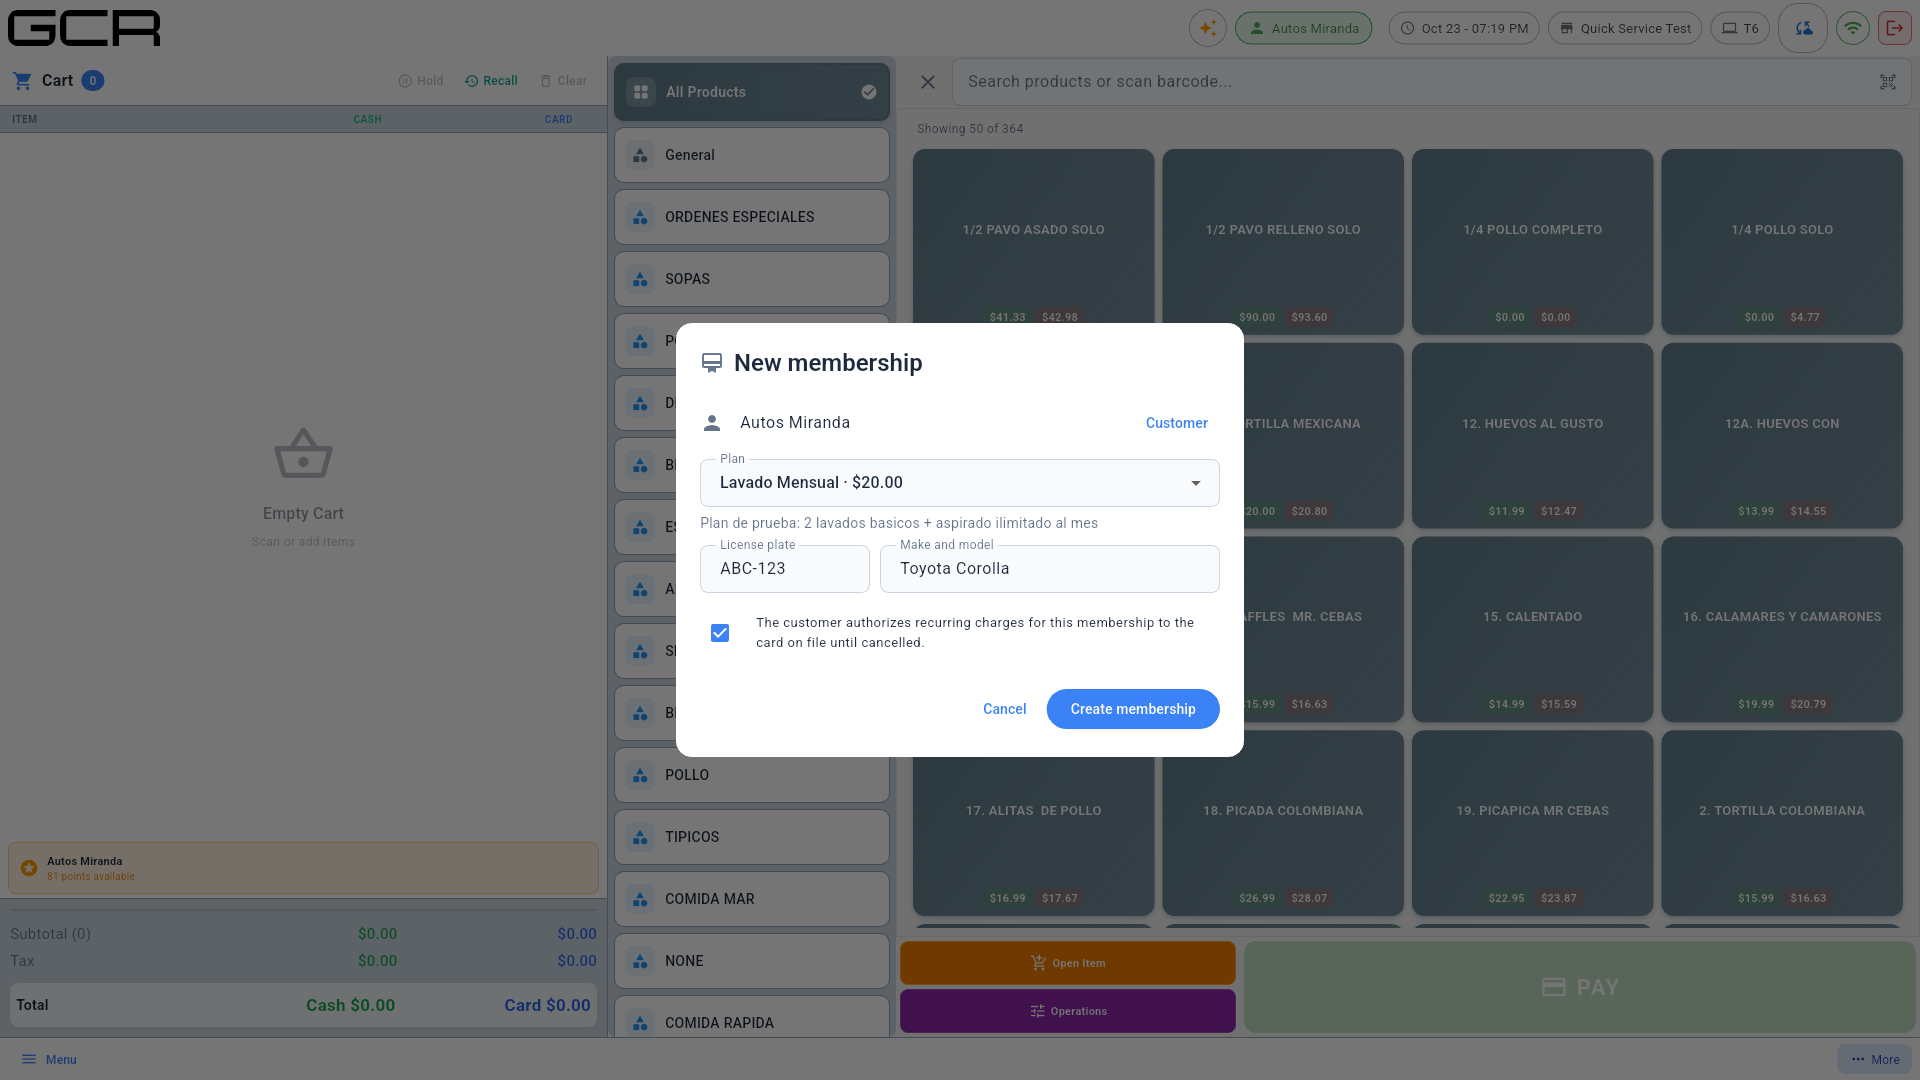
- New membership opens with that customer and the plan you tapped already chosen. Add plate and make/model if they apply, tick the consent box and tap Create membership.
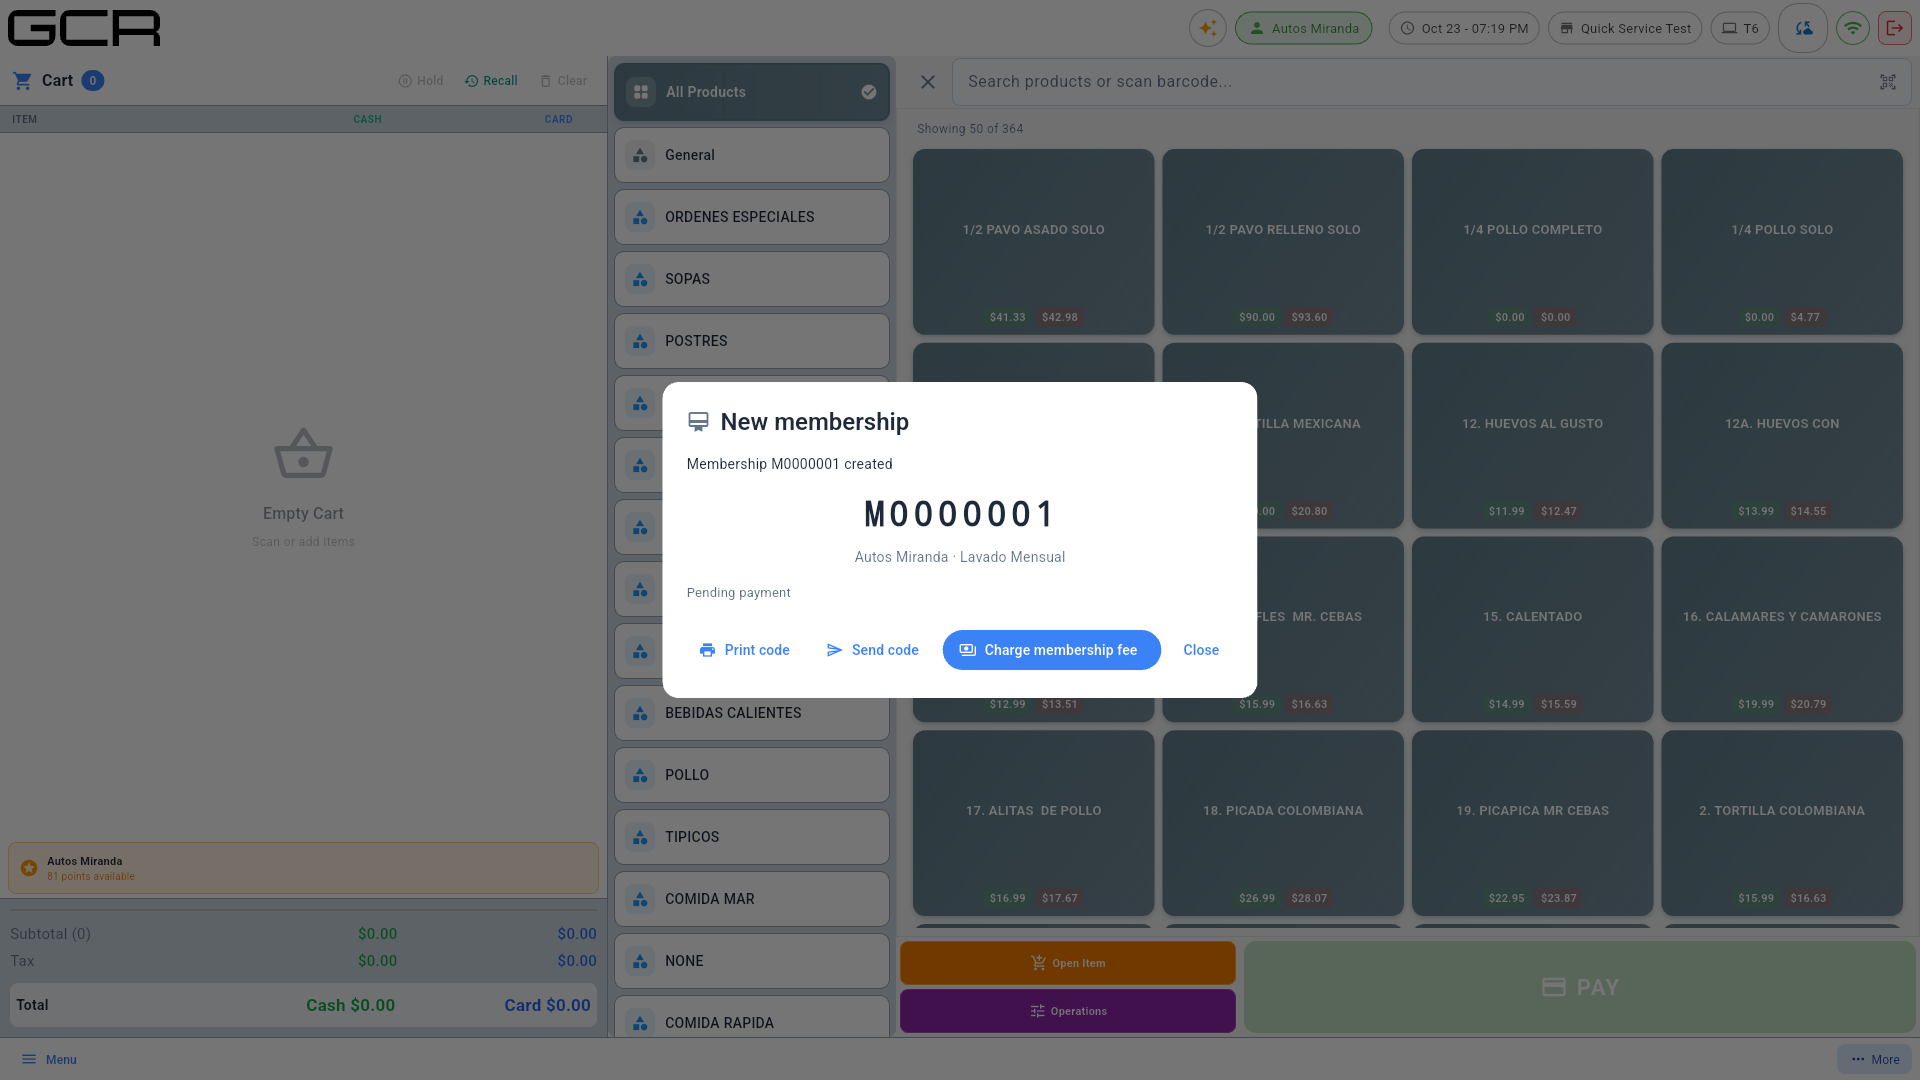
- Charge membership fee → PAY (card on the pinpad keeps the card on file, §6.3).
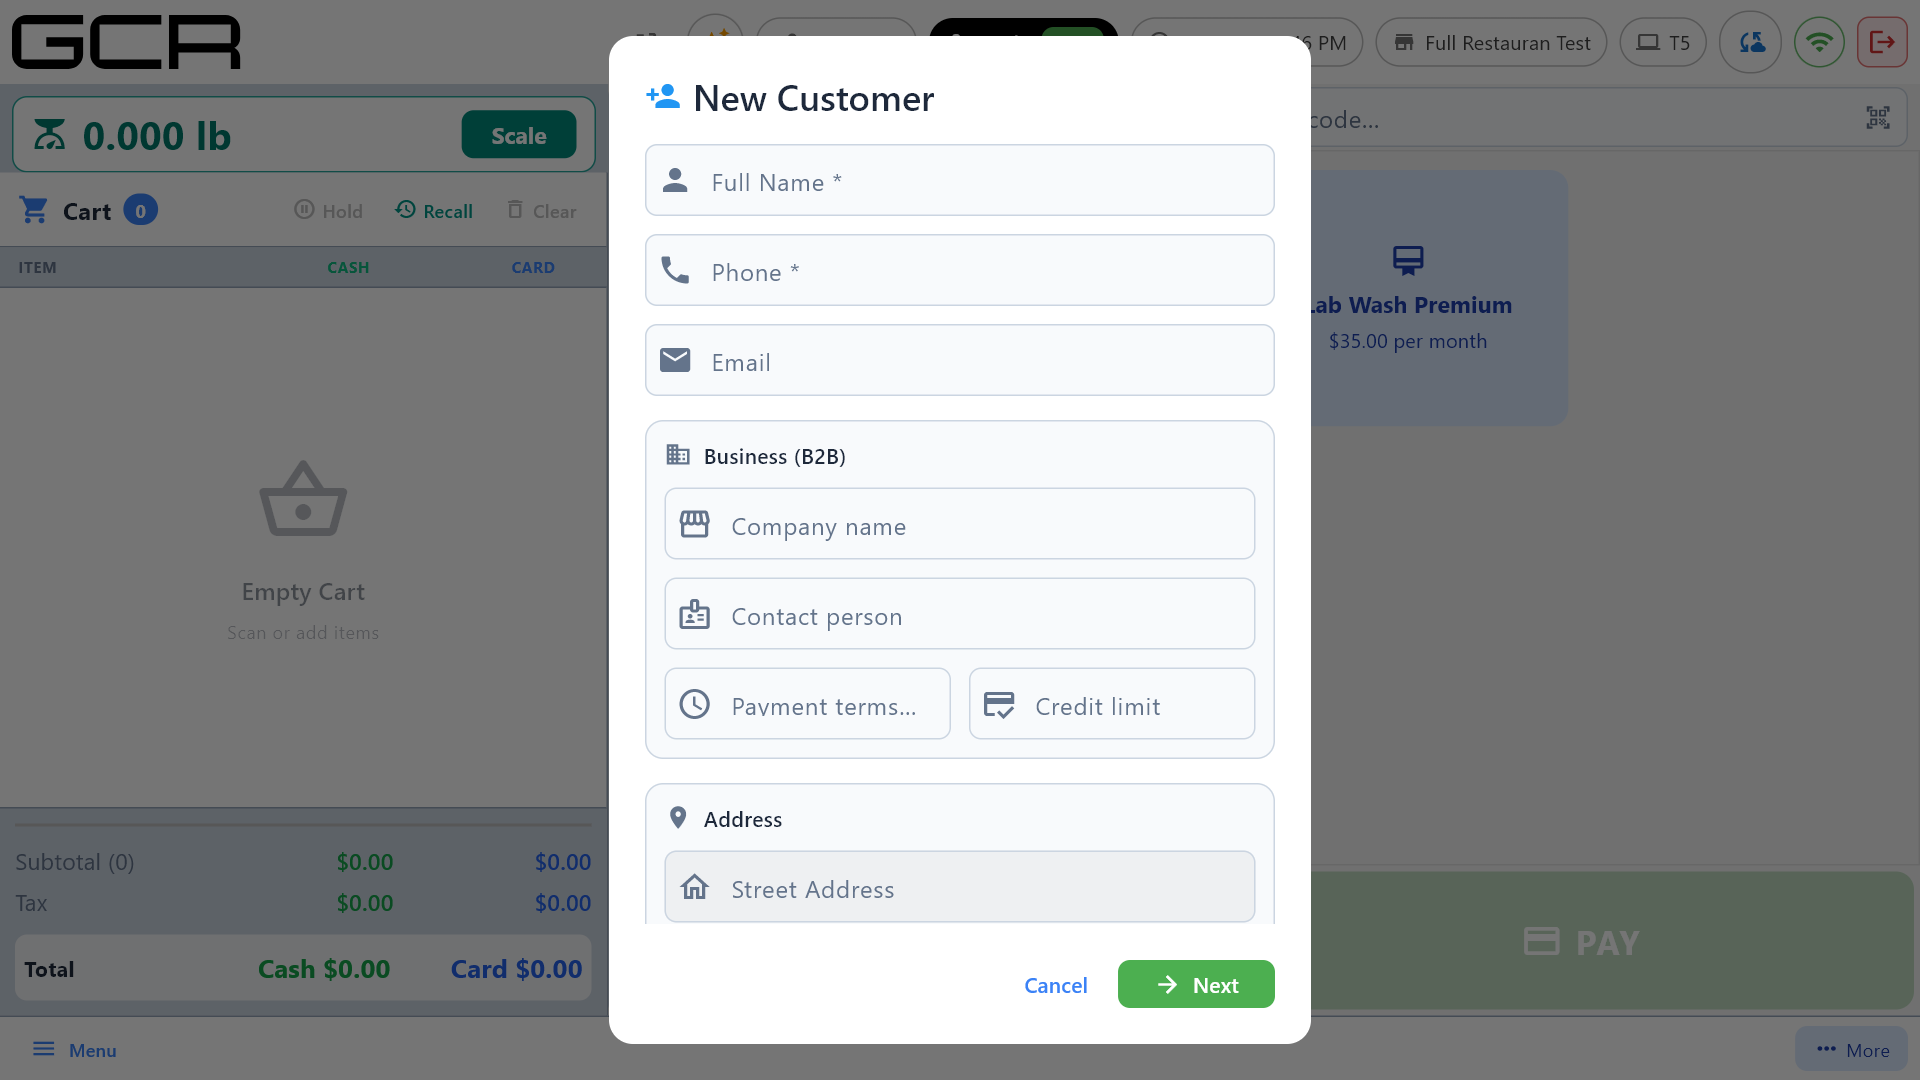
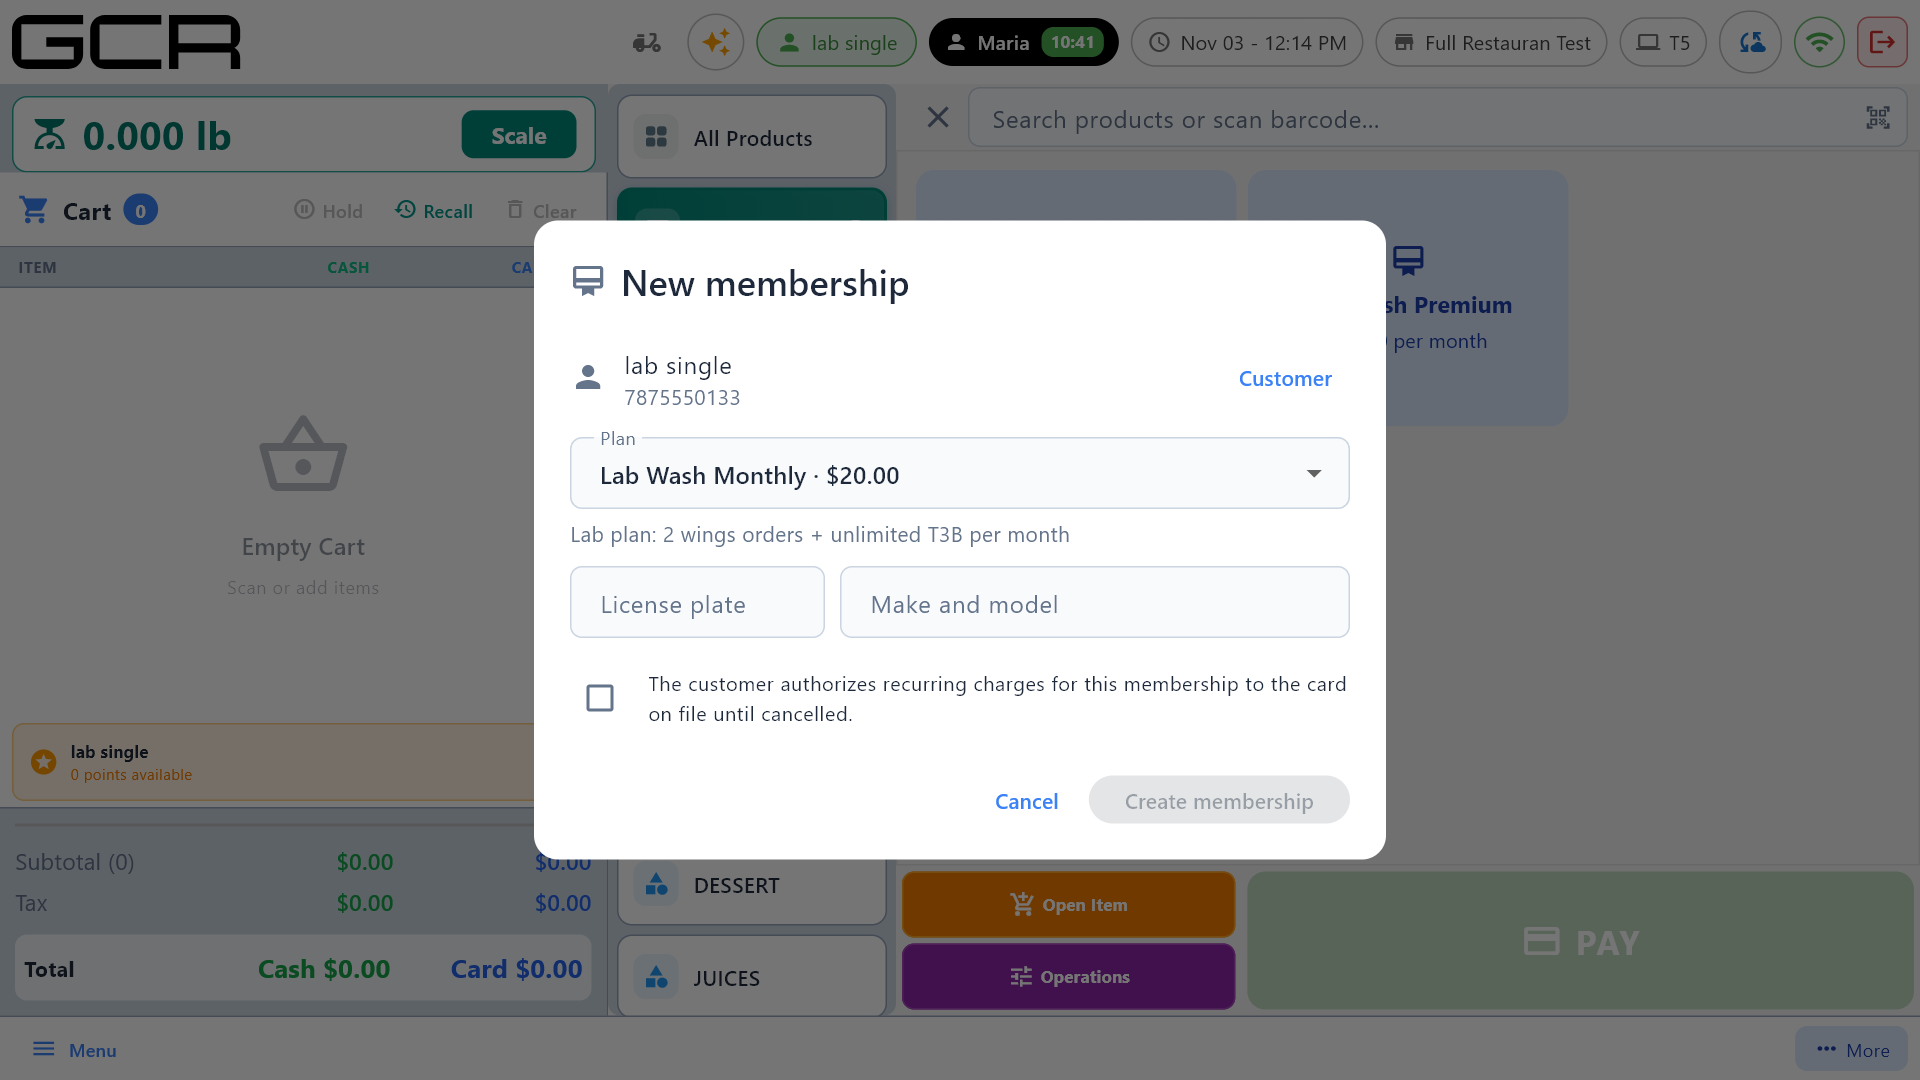
Right after creating a customer on a terminal that works through the store's local server, Create membership can take a few seconds while the customer reaches the cloud; the button keeps spinning and finishes by itself.
Any other category (or typing in the search bar) goes back to the products.
From the customer (the original way):
- Tap Customer, search or create the customer (e-mail and phone are used later to send them the code) and pick them.
- On "[Name] has no membership yet." tap Enroll.
- In New membership choose the plan (Choose a membership), fill in License plate and Make and model if they apply, and tick the consent box: "The customer authorizes recurring charges for this membership to the card on file until cancelled."
- Create membership → "Membership M0000003 created". It stays in Pending payment until the first fee is collected (§6.3). From this same screen you can Print code or Send code.
6.5 The member card: printing or sending the code
- Print code prints a card on the receipt printer with the store name, the barcode, the code in large type and the QR. A 1D scanner reads the barcode; a 2D scanner reads either. Reprint as often as needed.
- Send code offers By e-mail (whenever the customer has an e-mail) and By text message (when they have a phone). The e-mail carries the QR, the code and the plan so the customer can show it on their phone. Texts go out through the store's own Twilio account; if it is not set up the POS says "Text messages are not set up for this store (merchant portal → Settings)".
Memberships live in the cloud. Without internet the POS says "Memberships need an internet connection right now.": the panel, enrollment and visit recording are unavailable while regular sales keep working. It comes back on its own when the connection returns.
7. Repair orders (auto repair shops)
A repair shop takes the car in today and charges it days later. With Repair orders the car is recorded as an open work order under its customer and vehicle: labor and parts are added from any terminal of the store, the work order is printed for the customer and, when the car is ready, it is paid at the register like any sale. It works like the tables of a restaurant, but with cars.
It is enabled per store from the portal (Settings → Register Operations → Repair orders (auto shop)), ships off and shows only on terminals in Retail mode. On, the sales screen gains a bar with two buttons: New repair and In shop. Off, the POS works exactly as before.
7.1 Taking a car in (New repair)
- With the cart empty tap New repair. If a sale is in progress the POS asks you to hold or clear it first ("Hold or clear the current sale before opening a repair order"): a counter sale is never folded into an order that may stay open for days.
- Pick the customer or create one with New Customer. Every repair order has a customer: the person to call when the car is ready.
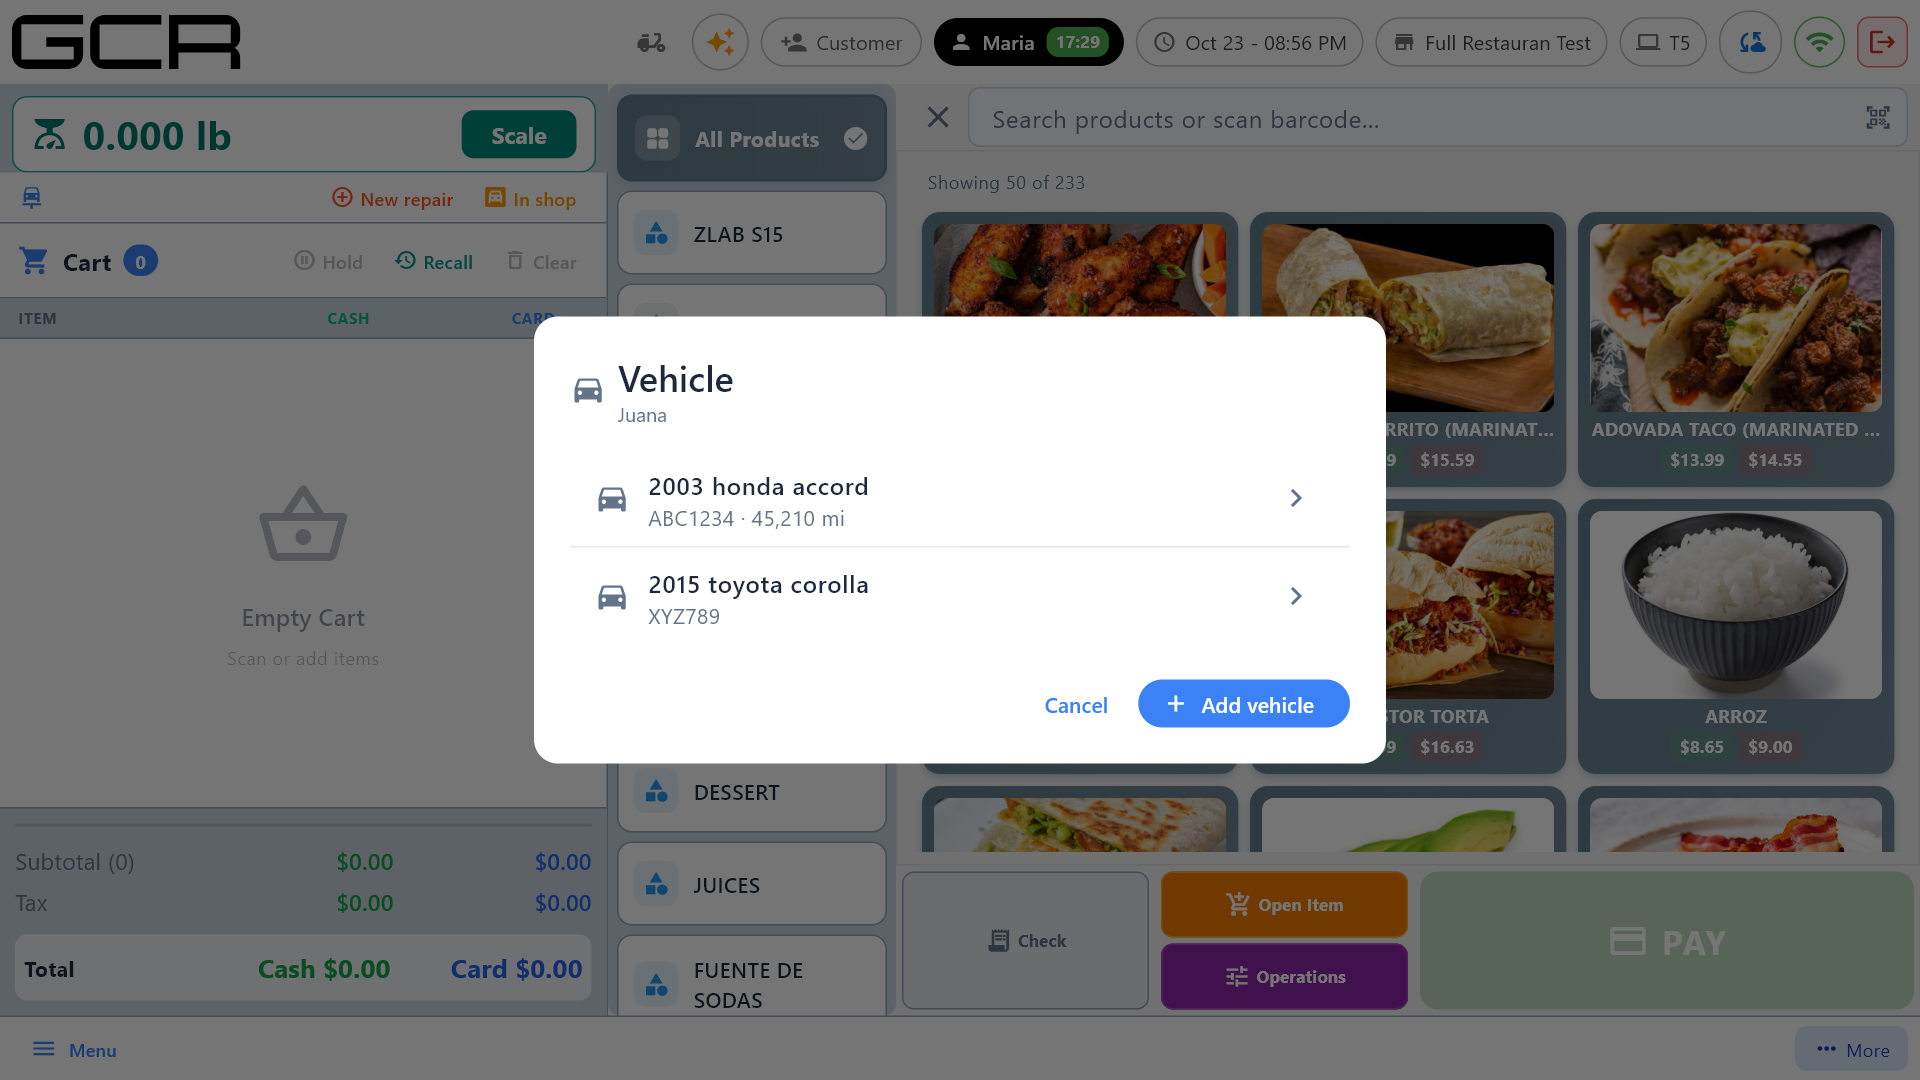
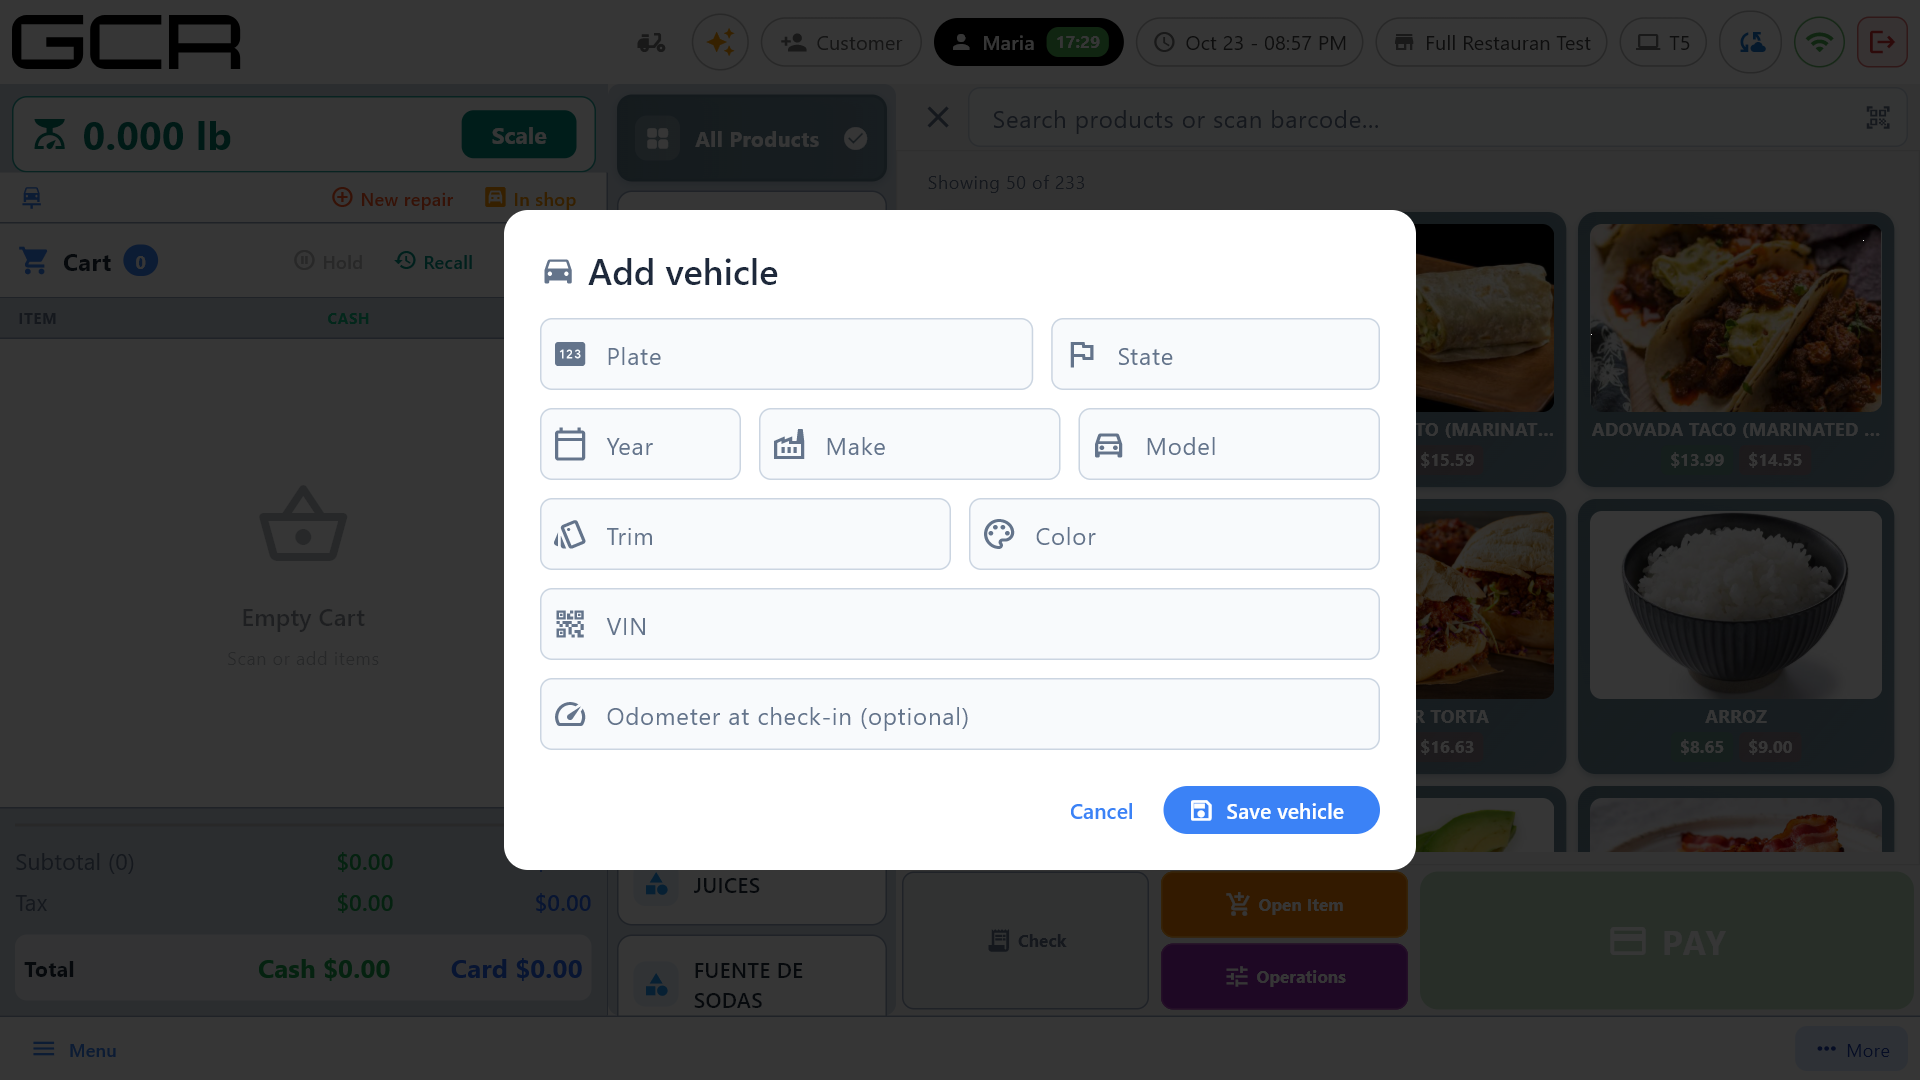
- Pick the vehicle among the customer's cars or tap Add vehicle: Plate and State, Year, Make, Model, Trim, Color, VIN and Odometer. Any one of three is enough to save it: the plate, the VIN, or year, make and model. The VIN is validated (17 characters, never I, O or Q, check digit); if the plate or VIN is already on file under another customer, the POS asks whether to move it to this customer.
- Enter the odometer at check-in (optional): it is kept on the vehicle as Last odometer.
- The order editor opens with the vehicle and customer in the header (Change corrects the car). Add labor and parts as regular products — grid, search or scanner; tap the line to change the quantity — and write the Complaint in the order note (Operations → Note).
- Tap Save work order: the POS says "Work order saved" and returns to the sales screen. The car is now In shop and every terminal of the store sees it.
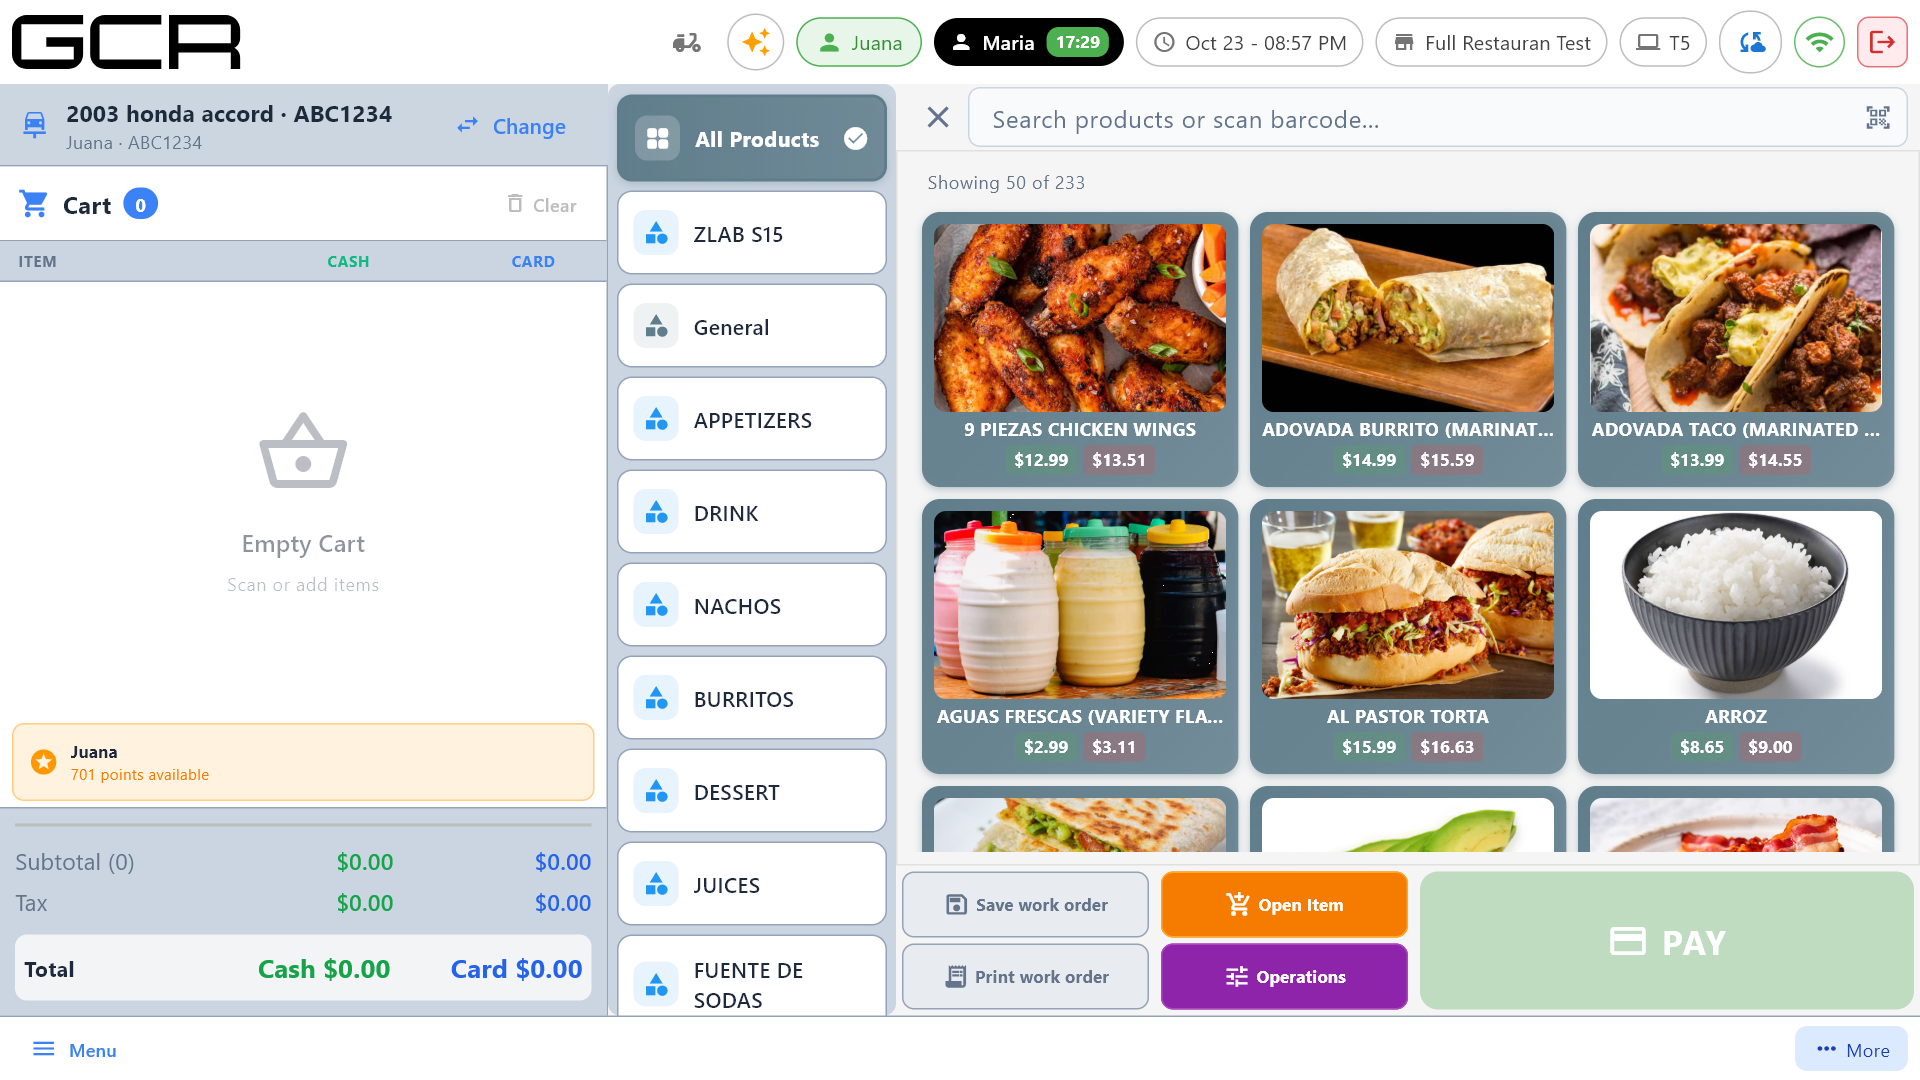
Print work order is enabled once the order is saved. On a new order, save first and print from the list or by reopening it.
7.2 Vehicles in shop
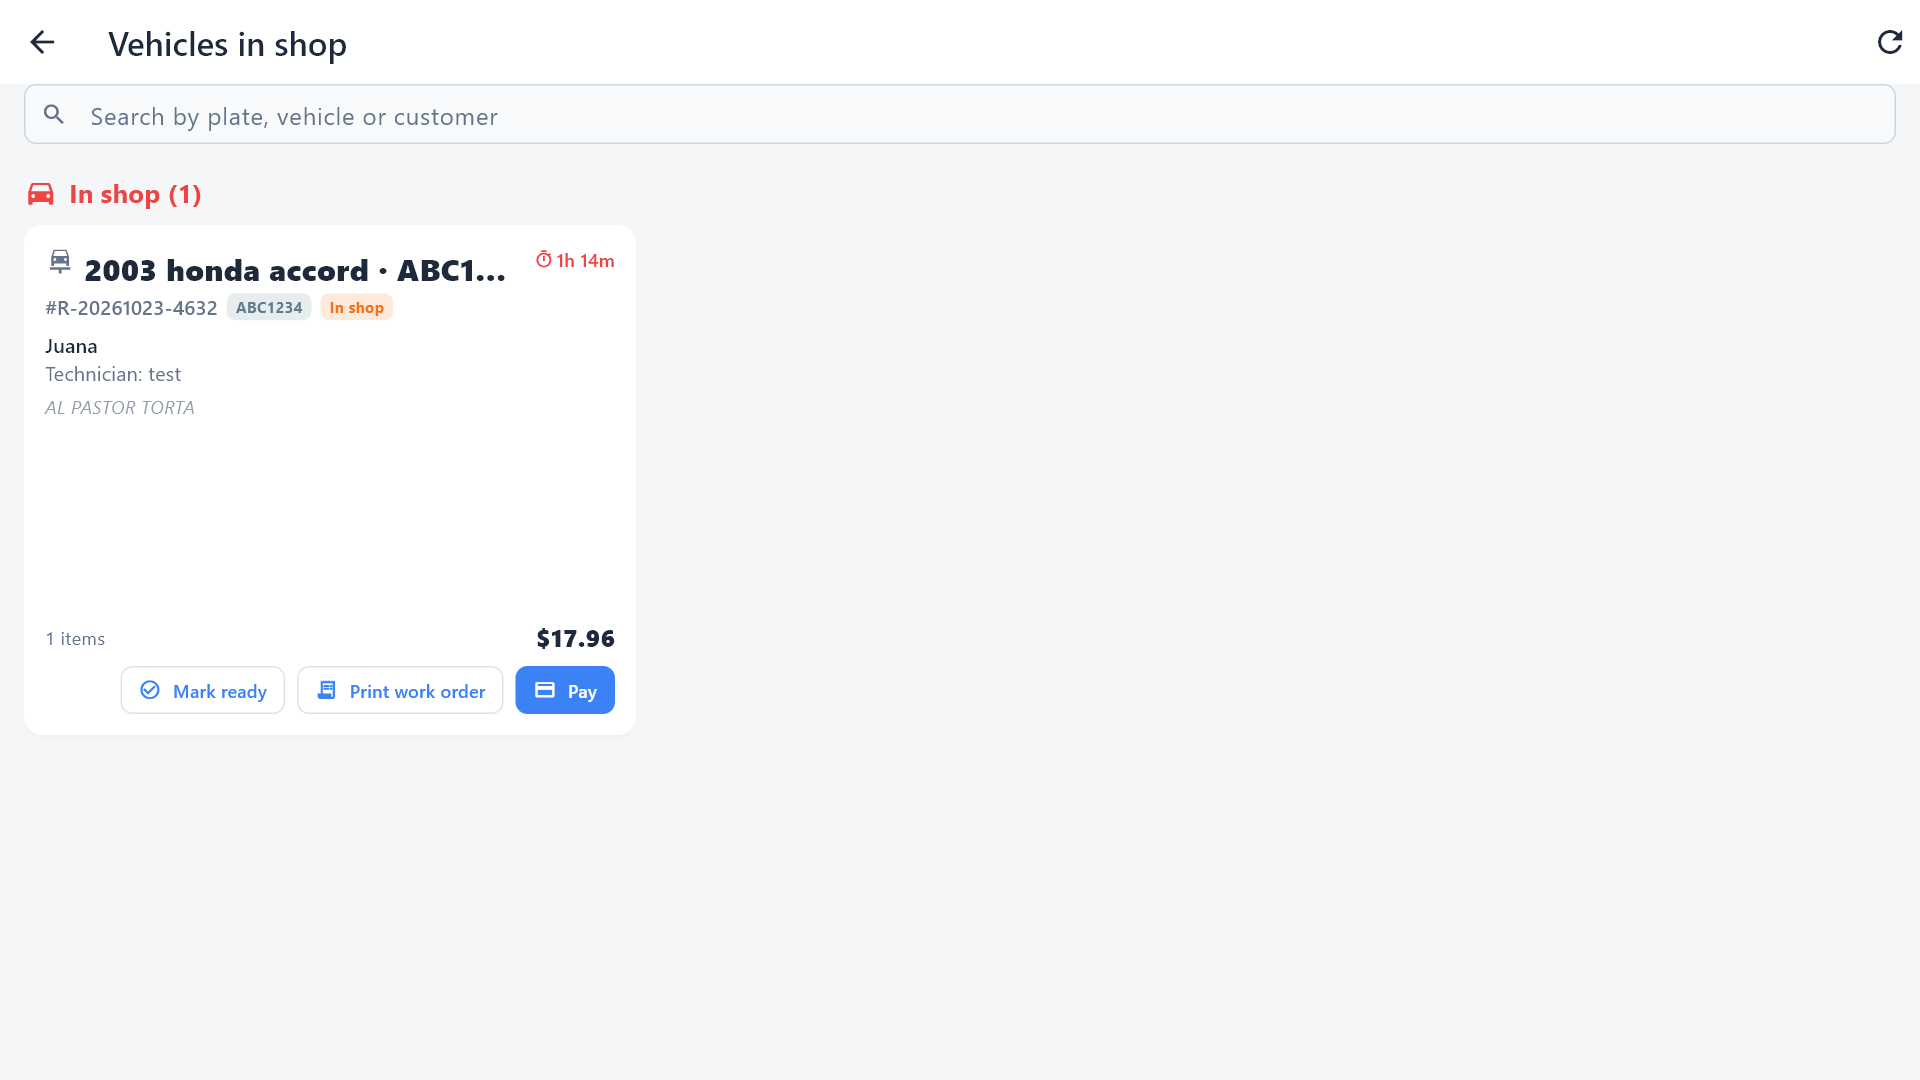
In shop opens the store's list of open cars, from any terminal. Each card shows the vehicle, the order number, the plate, the status (In shop or Ready for pickup), the customer, the technician who opened it, the items, the total and how long the car has been there (hours, and days past 24 h). The Search by plate, vehicle or customer box filters the list.
- Tap the card to reopen the order: add parts or labor, void lines and tap Update Order. Delete Order cancels it (the car left without paying).
- Mark ready sets the status to Ready for pickup (Back to in shop reverts it). It is a signal for the counter; it charges nothing.
- Print work order prints the work order (§7.3).
- Pay charges the car (§7.4).
Repair orders never reach the kitchen or the kitchen display (KDS): even when the store has print stations, a car never produces a kitchen ticket.
7.3 The printed work order
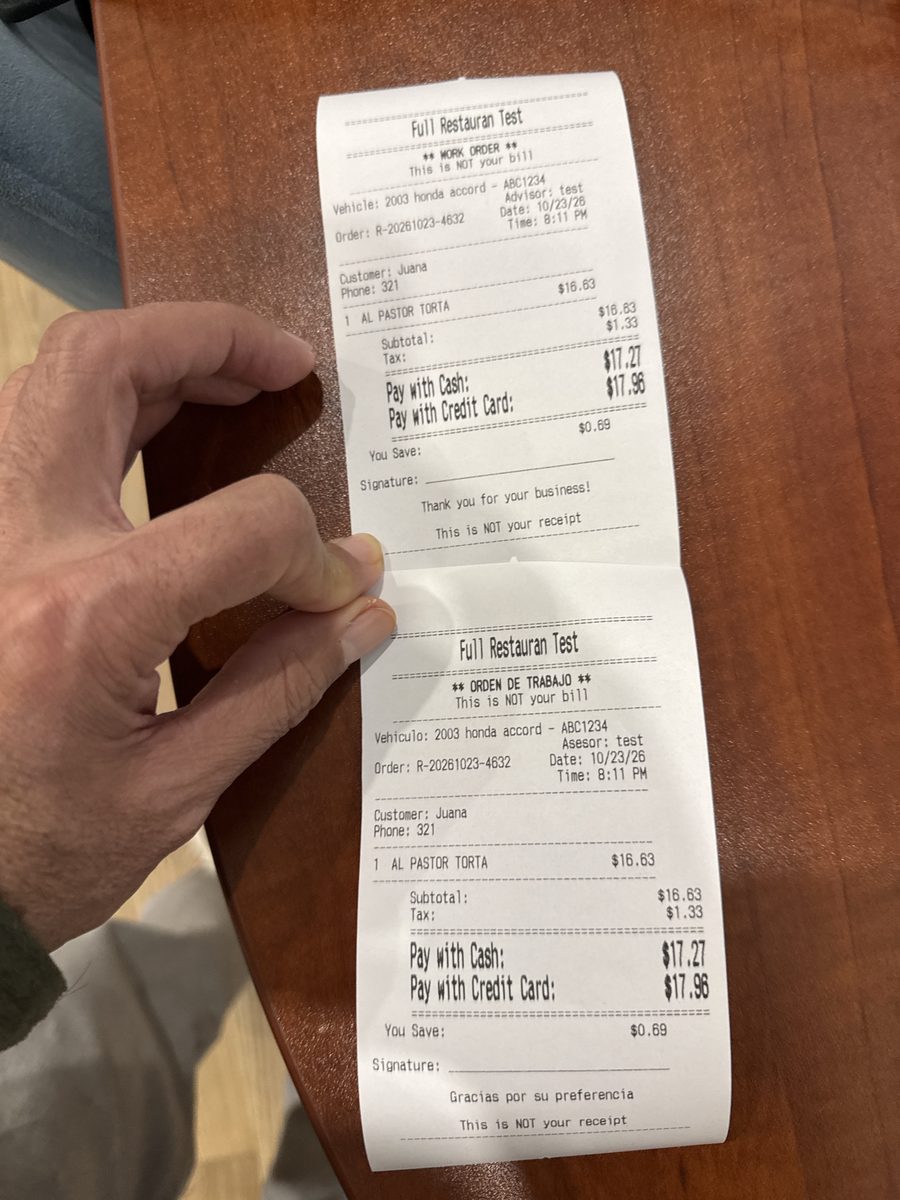
It prints on the receipt printer under the header WORK ORDER / This is NOT your bill: the vehicle, the advisor (who opened it), the order number, date and time, the customer and phone, the complaint, the lines with their prices, subtotal, tax and total (cash and card prices when the store uses dual pricing), a signature line and the footer Thank you for your business!. It is the paper the customer keeps while the car is in the shop; it is not the receipt: that one prints at payment.
7.4 Charging the car
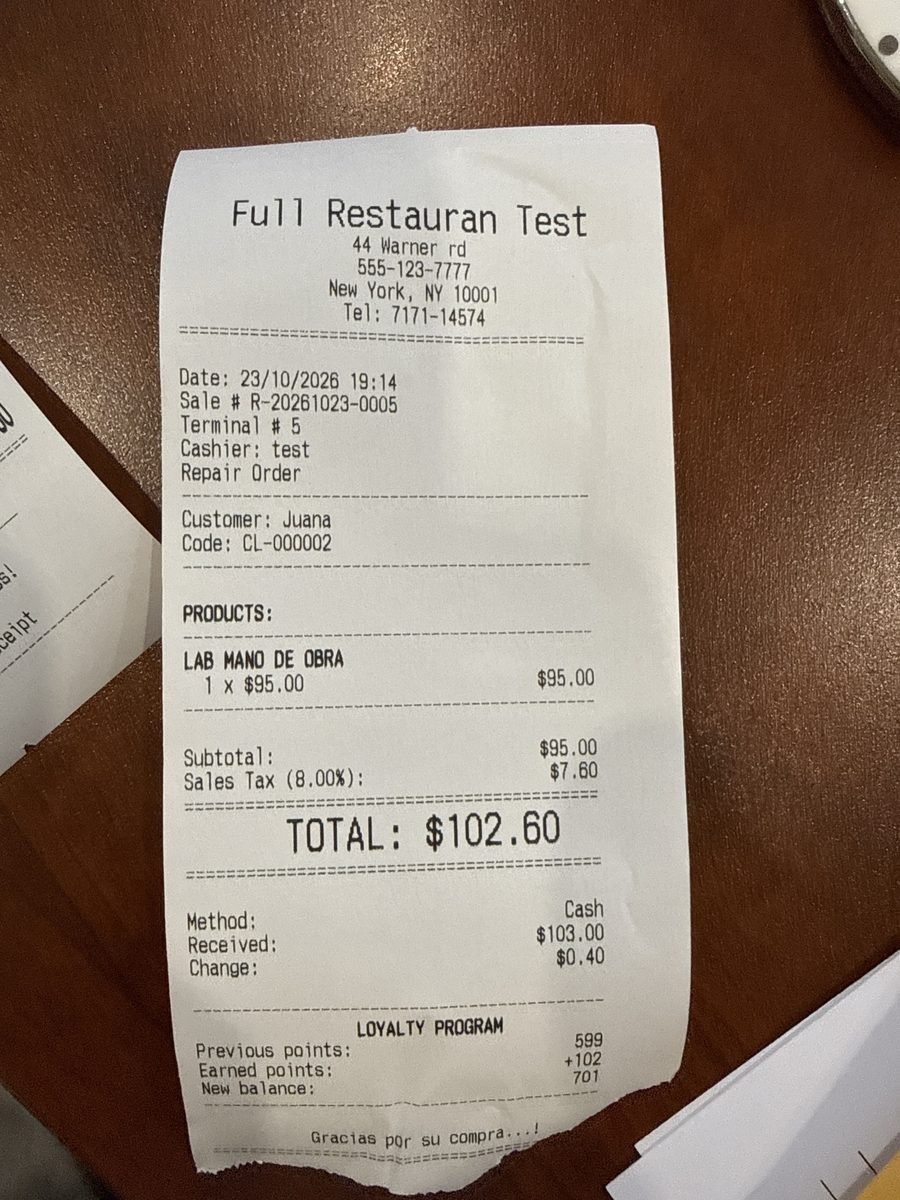
From the list tap Pay, or reopen the order and tap PAY. It is charged like any sale: cash or card, with its discounts and loyalty points. The receipt says Repair Order under the cashier and carries the customer.
- The sale belongs to the shift that charges it, not to the one that took the car in: an order opened on Monday and paid on Thursday lands in Thursday's Z. While open it affects no Z.
- Inventory of the parts is deducted at payment.
- With a card on the pinpad, the receipt carries the card details as in any sale.
7.5 Without internet
Vehicles live in the cloud. If the connection drops while opening an order, the POS says "The cloud is unreachable. Type the vehicle for now; it will be put on file next time." and offers Type the vehicle: enter the plate, carry on and save. The order stays on the terminal and reaches the cloud when the connection returns (it can take up to half an hour, or a restart of the app); until then In shop may not show that car.
8. Deli and hot food: orders to the kitchen
A grocery with a deli or hot food counter can send those items to the kitchen straight from the Retail register: the deli lines print at their kitchen print station and appear on the Kitchen Display, while grocery items (milk, soda) never reach the kitchen.
It is enabled per store from the portal (Settings → Register Operations → Kitchen in Retail / Supermarket), ships off. Then, on each deli product, the Kitchen tab: Requires Kitchen Preparation and its print station (Merchant Portal manual). Off, the register works exactly as before.
- Ring up the sale as always — scanner, grid or search. A cart can mix deli and grocery items.
- Charge it with any payment method.
- When the sale is paid, the deli items print at their station and show on the Kitchen Display; the kitchen marks the order Ready there.
- Only products marked for the kitchen go: a sale with no deli item is a normal retail sale.
- A sale with deli items is recorded as To Go (it shows that way in the sales list and in reports by order type).
- The kitchen ticket says TO GO, the sale number and, when the order has a name, FOR: name — the customer attached to the sale, or the self-order kiosk's "Kiosk #N - name".
- Self-order kiosk tickets scanned at the register follow the same path (Self-Order Kiosk manual).
- If the kitchen printer fails, the sale is still saved: the register shows an orange notice and the ticket is retried by itself.